Thursday 31 October 2019

AAR 5 - ACW Skirmish - Sixty-One Sixty-Five Rules

Yankees and Rebels fight a vicious and deadly melee in the corn fields...

Last Monday our scheduled game got put back so while on a roll we played another ACW skirmish with the Sixty-One-Sixty-Five Rules. This time we set up Scenario 2, 1863 Looking for Shoes! from the Rulebook. The Victory Conditions like Scenario 1 require both the sides to 'kill' 1/3 of the opposition to win. This time the USA was on the defensive with the chance an artillery piece would be deployed! There was lots of cover available to both sides and the CSA had a slight advantage in numbers, 80 figures to the USA's 72 (including the gun crew).

AAR, again I'll let the pictures tell the story!

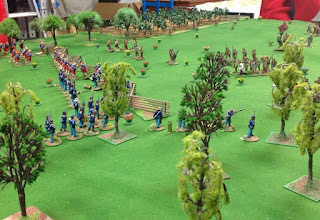
The Rebs on the attack entered from the table edge to the right of the picture and the Yankees deployed in lines to face them...

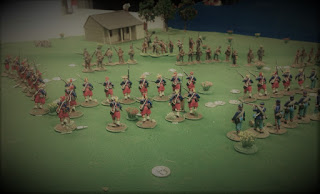
It wasn't long before the Rebel left faced off against the Northerners. The Zouaves drew first blood taking out 3 Southerners (round silver discs in the picture in front of the Rebs line)!

The Rebel right capture the cemetery but their skirmishers were forced back and a firefight commenced.

Rebs taking pot shots at the Bluebellies!

The view of the action from the Union line. The Confederate skirmishers were starting to tilt the balance, they took out some of the Union skirmishers and their fire created confusion in the Yankees lines. See in the picture below several Zouaves are turned to the rear these are men the skirmish fire had affected...

Union troops in the corn field face off but on this flank they are outnumbered 2 to 1! Where is their artillery gun!

An overview of the action 6 USA units facing off against 8 CSA ones. Both sides were keeping their men within command control so activations were easier to pass, still there was turnovers and still the Union Gun failed to arrive on the field of action. at this stage the game was in the balance with losses on both sides pretty well equal.

While a large Monty Python hand hovers Rebel skirmishers in the old barn continue to pepper the Zouaves. Note 4 figures are now reversed!

The Rebel left using their numbers enter the corn field and start turning the Yankee line...

Fighting rages in the corn field!

In the centre the Rebels advance the skirmishers having driven of the Yankees, in the distance the Zouaves now have 7 shaken figures out of 8 in the unit!!!! in the foreground Colonel Pepperhead cheers his men on!

Rebs softening up the Yanks in the corn field.

The Reb right meanwhile was pushing the Union line back...up goes the call again from the Yankee Officers, "Where's the artillery!"

The Reb right pushes the Union back, it seems like the Confederate skirmishers are multipling!

The fighting in the corn field continues...

...and decides the battle! On turn '8' the Rebs charge a unit of 8 Zouaves in the flank. The resulting die rolls gave the CSA a 4 to 1 win in the action indicating 4 casualties. Now the unit had 3 steady men and 5 shaken men in combat and all shaken men of a unit equal 1 casualty so in this case 8 men are taken out! This took the Union force past the breaking point!

The overview of the battlefield at the end of the game. these rules give players a good looking game!

A Confederate Victory!
Yankee losses 26 men
Rebel losses 11 men

So a Southern victory, again a good quick game was had and everyone enjoyed the evening (yes even the Yankee player!). This is the second time we've played this scenario and on both occasions the Yanks cannon has turn up either too late or not at all. I still wonder how it will affect the outcome! What I think in this game even though the total numbers are men are equal and neither side has a large qualitative advantage the Confederates have a good advantage in skirmishers 8 pairs to 6. considering the Reb knocked out a couple of Union pairs increasing that advantage all through the game there were more 'shaken' yanks than Rebs because of this affecting their fighting power. The Union's central unit did little as they tried to continually rally and the Zouaves that were wiped out in a melee had 5 out of 8 men shaken. Maybe the gun could have swept these pesky skirmishers aside we may know next time we try this game!

Thursday 24 October 2019

Revolutionary Guard Naval Battalion - Improvised Artillery Truck - TGAA

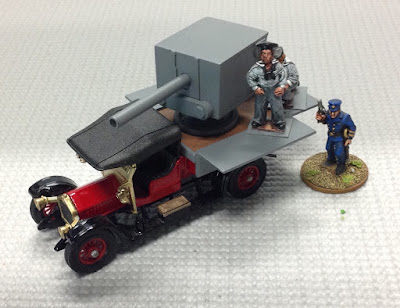
I completed one more Improvised Armoured Vehicle for The Great Antipodean Adventure games, a Crossley Artillery Truck. This will be the last of these for a while turning my attention to some VSF, WW II PTO and ACW projects that I have on the go and still need work...

Members of the Revolutionary Guard Naval Battalion inspect their new Mobile Artillery Vehicle at the Sydney Naval Dockyard Warehouses.
Notice the second vehicle in the background that was required to carry the six-man crew and ammunition as the Crossley was overloaded by the gun platform itself! The vehicles gunners discarded their whites for fatigue kit and donned black caps of the revolution!

Wednesday 18 May 1932, outraged by the deaths inflicted on protesters at the hands of the Police the previous day Sydney was engulfed in violence. Out of control and drunken mobs roamed the streets picking fights with Government forces, bystanders and each other! A large group moved on Government House reaching the building itself and lowering the Governor’s Standard and replacing it with a Union Banner!

Sailors aboard the destroyer HMAS Tattoo moored in Sydney Harbour who were sympathetic to the cause of the proletariat and following the news of the day closely were galvanised by the call of the ship’s lookout that a Union Banner now flew at Government House. Several gunners in the excitement of the moment and in the spirit of the Potemkin and Aurora trained the ships searchlight on the grounds of Government House and using the 2-pounder mounted amidships landed several rounds in the gardens!

Photo from navy.com.au site...
HMAS Tattoo
S Class H 26
1000 tonnes Crew 90
3 x 4” guns 1 x 2lb PomPom 1 x Maxim Gun 4 x Lewis Guns
Commander; Lieutenant Commander John Miller

Lieutenant Commander Miller and Lieutenant Harries commanding the HMAS Tattoo were awakened by the thunder of their ship's guns firing. Alarmed they rushed to the deck to see what was taking place! They were horrified when they were confronted by the actions of the ship’s ratings. These sailors were firing on their own countrymen! They quickly subdued the gunners involved with their trusty revolvers and with the help of other Officers arriving on the deck had the miscreants escorted to the brig. While they and the other officers were involved at the 2-ponder gun though around 70 other sailors, over two thirds of the ship’s crew embarked from the HMAS Tattoo on an adjacent cutter and headed to shore to join the revolutionary mobs...

In the days following the sailor’s desertion of the Tattoo the were not idle. Their numbers were boosted by other discontented naval personnel and their leaders contacted Union representatives. The sailors were soon armed and they also raided the decommissioned cruiser HMAS Brisbane and decamped with a 3-pounder gun and a supply of ammunition. The engineers amongst them quickly converted a Crossley truck into a mobile artillery platform using the 3-pounder at abandon warehouses in Sydney's Naval Dockyards. This awesome piece of kit made the so called Revolutionary Guard Naval Battalion (all 168 of them) the shock force of the Union led factions. This was despite the sailors having no training in the role of foot soldiers and their Crossley Artillery Truck being slow and mechanically unreliable! 

It would not long before the members of the Revolutionary Guard Naval Battalion and there Crossley Artillery Truck were to see action...

Building the Crossley Artillery Truck

Another Crossley from the Model of Yesteryear range was the basis for this conversion. The tray load was unclipped and two rear platforms were made from 1mm sheet styrene one with armoured sides up the other with them deployed. Then a single turret was built from the same 1mm plastic and bits and pieces from the spare parts box were used to create the mounting and the 3-pounder gun.

Just like most these conversions this update is ‘reversible’ and the vehicles can be put back to their original state!

The conversion parts assembled...

Turret test fitted...

All painted up (battleship grey of course!) and tested again...

Crewed up and ready for action!


I love building this sort of kit, you can just let your mind go wild and stretch the boundaries of reality! Hope you like this 'beast'!

Friday 18 October 2019

The Colonel's Armoured Staff Car - The Great Antipodean Adventure

May 31st 1932 the New Guards freshly appointed Colonel Barty Philpot took possession of his newly armoured staff car. A few days earlier he had his 'man' deliver his personnel transport, a magnificent Hispano-Suiza J12 to the Randwick Tramways Workshops to be armoured for use as his personal transport through the strife ravaged streets of Sydney! An all welded armoured box was custom built and could be lowered onto the existing J12 body and lifted off when required. The armour was deemed bullet proof and was painted in a rich green to match the coachwork. The design of the fighting compartment included port hole windows with armoured shutters for viewing, a single large armoured door, it retained access to the boot space and a Vickers MG was fitted to the roof with an armoured shield. Even with all the extra weight the J12's 250HP V12 engine could still deliver a top speed over and above that of any other vehicle that it could be expect to encounter.


A proud Colonel Philpot with his New Guard Batman view his new Armoured staff car outside of his Bellevue Hill property...

For a few bucks each the Matchbox Models of Yesteryear are a good source of 1/56ish vehicles! Here's Colonel Philpot with his Hispano-Suiza J2...

Here's the armoured box made from 0.5mm and 1.0mm sheet styrene, washers, wire, toothbrush head coloured ring and a Vickers from my spare parts box (can't remember the maker)...


The armoured box test fitted...

Paint applied...

..and placed on the car.


I picked up several Models of Yesteryear vehicles in couple of deals recently and adding them to what I have now have more than enough motor transport for the Great Antipodean Adventure....interestingly the most recent deal had three cars and a Medium Mark C Hornet tank, might need to try and fit that in somehow! Below are the latest purchases...

Wednesday 16 October 2019

AAR 4 - ACW Skirmish - Sixty-One Sixty-Five Rules

Last Monday we decided to revisit the Sixty-One-Sixty-Five ACW Skirmish Rules. We set up Scenario 1, 1861 First Blood from the Rulebook and went for it! In this game the Victory Conditions require both the sides to 'kill' 1/3 of the opposition to secure the win. The CSA is sort of on the defensive and have a fence line to defend if they can get to it while the slightly superior USA force have to splash through a stream to try to get to grips with the CSA men while they are in the open.

Yankee infantry firing as the advance on the Confederate line!

Dave took up the cudgels commanding the Southerners and Al and George led the Northerners I sat back in a no lose position and Umpired! I'll let the pictures tell the story.

The Yankees start well surging across the stream!


On the other hand due to cripplingly poor activation rolls the Confederates struggled forward in dribs and drabs!

The Yankee Zouaves reached the fence first which boded badly for the Rebels but despite that the boys in grey drew first blood and knocked out a couple of the Bluebellies skirmish teams...

This overall shot view shows the Union troops taking cover behind the fence while over a third of the Southerners still haven't moved and are far to the rear of the action! On the right of the picture you can see some of George's 'pantalooned' troops moving to flank the Rebel right...

The Yankees begin turning the Confederate left as well, volunteer militia skirmishers can be seen in the woods... at this point they got a crucial shot in and killed a Rebel NCO, this severely hamper the Confederates for the rest of the game!

Overall view showing the field of action with the formed Union troops firing from the fence. They picked off several Rebel skirmishers and losses for both sides stood at a handful men, the Rebels needing to kill 25 and the Yankees 18 to secure victory...

The Rebel Captain urged his men on, yes as I have said before with 61-65 AAR's Unit Colours probably wouldn't be at such skirmishers but the look so good

Not to be outdone the Union command team showed their true colours!

The Zouaves flank move on the Rebel right is developing as a Union infantry charge took place on the opposite flank. That charge failed and the Rebels held their ground and inflicted more casualties on the boys in blue. At this point the Rebs despite the dice were stymieing every Union effort to break them!

With fewer troops and their opposition on their flanks the Confederates decided discretion was the better part of valour and began withdrawing but again poor activation rolls made this difficult to achieve. They managed to pick off a couple more Union troops amidst the confusion though to keep the pressure on the Northerners. It was now 14 Yankees down for only 8 Rebs!

At this point of the game the Southerners bad luck with activation rolls hit an all time low! Requiring 2+ on 6 sided dice to get into the action a team of Skirmishers rolled three 1's the initiative turned over to the Yankees and the last of hope a Confederate victory evaporated!

The hand of God...well George actually indicating the Rebs right flank was hanging in the air...

Another view of the Rebs right with a unit of Zouaves about to charge...as luck would have it the result was not as devastating as it could have been...

...but combined with a few casualties from fire it was enough to push the Confederates to their breaking point!

Huzzah!

The view of victory from the Union side of the battlefield...

The Rebels beaten but still defiant...just moments before skedaddling!

The battlefield at the end of the game.

Well an enjoyable night! Victory to Al and George. Despite his poor rolling Dave kept in the game until the very end, he was able to keep the Yankee losses higher than his until last moment despite being severely handicapped with poor activation rolls.

Even though not a 100% accurate representation of how skirmishers were deployed in the ACW these rules give; a great ACW feel to the action and a very good game! we will replay Scenario 2 from the rules after a couple of WW II sessions.

An aside I am toying with turning these rules into a true ACW skirmish format where every man can be a skirmisher and 'lines' can be formed in groups (with subsections each of up to 8 men) when the player requires them, I am going to try that solo before unleashing onto anyone else!