Aussie Infantry support a mighty Lanchester Armoured Car manned by the SSVF...

Game three of our Malaya 1942 Campaign is done and dusted! As the Japs were stymied last time it is a replay of that scenario but slightly further down the road, so again we are playing a Probe game.
Updated Leader names...
Aussie Platoon HQ, Lieutenant Graham Witherspoon, Sergeant Barry Griswald
Section 1, Sergeant McCarthy
Section 2, Sergeant Thompson
Japanese Platoon HQ, Rikugun Mitsubishi, Gunso Toyota
Section 1, Gucho Daihatsu
Section 2, Gucho Suzuki
Section 3, Gucho Isuzu
Mortar Section, Gunso Shitmee
Sniper, Jōtōhei Sanyo
Revised Australian End of Game 2 Process
Aussie after Game Stuff
Section 1: 4 Casualties
Section 3: Sergeant Wounded 5 Casualties
Total 9 Casualties
6 Return due to Force Morale Difference
1 returns next Game
1 returns next Game from Game 1
1 misses next Game
1 Killed
Total reduction of 1 figure for the next game!
Game 3 'Probe' Scenario
Aussie Forces
Core Platoon (less five casualties)
Lanchester Armoured car
Jap Forces
Core Platoon (New)
MMG Team
Sniper Team
The Battlefield
Lots of jungle on this battlefield, beside the main road heading north to south there are two areas of wild bamboo to the west of it and one area of open ground to its east...
Force actions/movements are shown, the Australians in Blue and the Japanese in Yellow...


The AAR
The jungle road and its surrounds where still and quiet as Lieutenant Witherspoon consulted his section leaders as he expected another Japanese attack. He proceeded to address them detailing his plans. Half way through his briefing a shrill whistle pierced the serene jungle and all hell broke loose, the wildlife scattered and the air was filled with shooting and shouts in Japanese! Sergeant Griswald coolly commented to his Lieutenant, "Briefing over then Sir?
The Japanese Officer, Rikugun Mitsubishi had launched an attack on the Aussie position to the east of the road to Singapore with his full strength, after being beaten previously honour demanded he defeat these Australians!
Two Jap sections deployed either side of a clearing in the jungle and advanced on the two Australian sections that had arrived to face them. A desultory firefight broke out a long range with little effect!
But Mitsubishi upped the ante setting ordering his mortar section into support and deploying Type 92 machinegun. His Number Two Gunso Toyota also arrived at this point with the last of the platoon's sections. He led an attempt to infiltrate the Australian left! Sergeant McCarthy's men on the extreme right of the Australian position noticed this and sent word to their CO!
Outnumbered the Australians held back awaiting more troops as the terrain was not favouring them in this engagement. They fell back out of the Japs line of sight, it was a waiting game for them!
The Japanese machinegun fire and mortar barrage hit McCarthy's men hard causing casualties and suppressing them while Gucho Daihatsu led his brave soldiers around their flank.
Desperate to retrieve the situation on their right the Australians launched a counter attack on the Japs right to distract them! The attacked was led by Witherspoon himself included Sergeant Ingliss's understrength section, the platoon's mortar team and a formidable Lanchester Armoured Car! This attack put great pressure on the Japs right and despite taking casualties Gucho Suzuki's men held firm under fire though!
At the height of the fire fight Japanese Sniper, Jōtōhei Sanyo coolly took a bead on an Australian he believed was in command of their flank attack, he took a deep breath steadied his weapon and gently squeezed the trigger...the shot missed, he cursed and then he lost sight of his enemy in the jungle! He settled to wait for another chance!
Irrespective of the pressure the Australian attack was having Rikugun Mitsubishi persisted with his own advance. On the Jap left covered effectively while the mortars and an MG Gucho Daihatsu and his men appeared to be on the verge of turning the enemy's flank! Lieutenant Witherspoon seeing his attack stalled and Japanese moving around McCarthy's position he decided the situation was lost and holding this position would only result in heavy losses he gave the order to withdraw, his men disengaged and withdrew southward.
Rikugun Mitsubishi cursed he was victorious but the Australians had again slipped away he ordered and immediate pursuit...BANZAI!
Some Pictures of the Action


Gucho Suzuki's section deploys during the opening phase on the Japanese right...

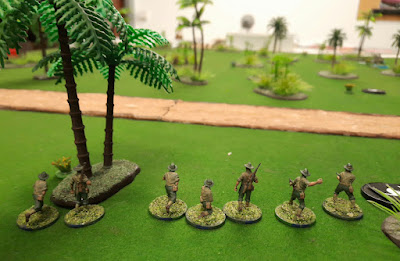
McCarthy's men are the first Aussies into the action east of the Singapore Road they immediately went into Overwatch!

First movements from both sides, two Aussie sections deploy on the left of the picture whilst to the right Japanese can be seen, of note the Aussies have deployed out of sight of the Japs but in doing so have left two of their JOPs unguarded!

The reserve Aussie section (understrength) arrive on the battlefield to engage the Jap right...

Aussie support arrives, a Lanchester of the SSVF!
In the picture to its right is Thompson's section they saw little action in this fight.

The Lanchester takes on 'defenceless' Jap infantry!
What's the Japanese for "Bugger Me!"?

And because its such a cool vehicle (OTP Model) here's the Lanchester again!

McCarthy's men were hit by MG & mortar fire reducing their effectiveness, in the background the cunning Japanese can be seen advancing take advantage of this!

Jap Sniper, Jōtōhei Sanyo takes a shot at the Aussies, clever figure placement by the Japanese player!

Gucho Daihatsu's troops make a dash for victory but a total victory is thwarted by the Australian Forces who withdraw!

Battlefield positions at games end from the southern (Australian) perspective.

Result Stuff
A Japanese Victory! An Australian Losing Draw!
Again the game ran smoothly, we had to look up the rules once checking on visibility from a buttoned vehicle! Again had time after the game to complete the Sharp End 'end of game' processes on the night!
We had to re-calculate the Aussie strength before starting because unlike Game 1 at the end of Game 2 the winning side had a six point Force Morale advantage so this greatly helped the Aussies who after the recount were only five men down a big difference to original nine (page 18 of the Sharp End)!
This game due to the lay of the land saw a lot less casualties on both sides five for the Japs and two for the Aussies and the 'end of game' process was decidedly in favour of the Aussies, Lieutenant Witherspoon looks like battalion Command material, whereas Rikugun Mitsubishi needs to take some charisma lessons!
Also this game included our first roll of four 6's! A Random Event! The Aussies rolled it and it resulted in another Jap section being automatically deployed where the Japanese player wanted!!!
Overall after this game Campaign wise the Japs are still on track for an overall win, pressure is on the Aussies! Next game will be in two or three sessions time.
Aussie after Game Stuff
Section 1: 2 Casualties
Total 2 Casualties
1 returns next Game
2 return from game 1
1 Killed
Total reduction +1 figure for the next game! An increase in strength Yeah!
For Campaign resolution:
CO Opinion Running Total = +4
+1 for Losing Draw Roll
OR Opinion Running Total = +3
+2 for Light losses than Japanese
Jap after Game Stuff
Sekushon 2: 5 Casualties
Total 5 Casualties!
2 returns next Game
1 misses the next Game then returns
2 Killed
Replacement Roll gives 3 extra men
Total reduction 0 figures for the next game! So full strength again!
For Campaign resolution:
CO Opinion Running Total = +1
+1 for Victory Roll
OR Opinion = -3
-1 for More losses than enemy Roll!
-2 for Heavy Losses Roll
Great stuff Captain!
ReplyDeleteCheers Ben!
ReplyDelete