Barossa, the attempt by a combined Anglo-Spanish force to lift the siege of Cadiz in 1811. A quite well documented battle, fascinating for several reasons and very playable in the course of an evening. The Anglo-Spanish force sailed from Cadiz and landed in Southern Spain with the idea of marching north to engage the French forces from the rear. This was to coincide with a sortie across the river on a pontoon bridge from Cadiz. Quite a sound plan really, except the Spaniards and British found it difficult to coordinate and the French got wind of the plan, setting an ambush for the relieving force.
I will confess I was drawn to Barossa through Cornwell and Sharpe, but the historical connection through a certain Colonel Light, planner of Adelaide, who named the Barossa Valley after the battle, was appealing.
Using Lasalle rules in 6mm, Pete provided the figures and I was able to get some of the flavour of the engagement by refereeing the battle. First Dave, then Alan, commanded the French forces while Pete, who knew something of the historical outcome, commanded the Brits. The involvement of the Spanish was confined to the cavalry who, with the KGL hussars, were present around Barossa Hill. The Battle between the Spanish under La Pena and the French Division under Villatte, which took place a mile or so north, provided the sound of distant gunfire and an impetus.
The battle begins with the British, commanded by Lieutenant Thomas Graham (two Brigades under Dilkes and Wheatley) in the middle of the forest of Chiclana, following a track north to rejoin La Pena. Graham has wisely seen the tactical importance of Barossa Hill and has left, after negotiation with La Pena, 6 battalions of Spanish troops and a flank battalion under Browne to safeguard the hill. He is now stuck in the forest, strung out along the track, oblivious to everything except the sound of gunfire from the southern end of the Isle de Leon, where La Pena is engaging Villatte's division.
The French have two more divisions, under Ruffin and Leval, who are advancing from the east from a concealed position with the intention of overwhelming the Anglo-British force and attacking them in the flank while they are strung out along the coast road. Marshal Victor is in overall command of the French.
Both players have been provided with maps with only their positions indicated. Both players have a written briefing and a précis of the strategic aims. The English are exhausted and befuddled, frustrated with La Pena in command. The French are enthusiastic but a little uncertain how they will find the opposing army.
BRITISH OOB Barossa
Lt General Thomas Graham
First Brigade (DILKES)
|
|
|
2nd/1st Foot Guards (Grenadier Guards)
|
|
BN Valiant/Exp Guard
|
2nd Coldstream Guards
|
|
BN Valiant/Exp Guard
|
2nd/3rd Guards (Scots Guards)
|
|
Large BN Valiant/Exp Guard
|
2nd/95th Rifles
|
Captain Norcott
|
BN Valiant/Exp Maybe Irregular
|
Artillery
|
|
|
6x 9pndr, 4 x 9pndr
|
Major Duncan
|
2 batteries.
|
Cavalry
|
Colonel Whittingham
|
|
KGL Hussars 1st Squadron
|
|
BN, Valiant/Exp Pursuit
|
KGL Hussars 2nd Squadron
|
|
BN, Valiant/Exp Pursuit
|
|
|
|
2nd Bigade COLONEL
WHEATLEY
|
|
|
1st/28th Foot Gloucesters
|
Colonel Belson
|
BN, Reliable/Exp
|
2nd/67th Foot Hamptonshire
|
|
BN, Reliable/Exp
|
2nd/87th Foot Prince of
Wales Irish
|
Major Hugh Cough
|
BN, Valiant/Exp
|
|
|
|
Flank battalions (Indep)
|
|
|
Gibraltar
(1st/9th foot,
1st/28th foot, 2nd/82nd Foot, 2 companies of each)
|
Browne
|
Large BN, Valiant/Exp SK3
|
Cadiz
(2nd/47th foot
2 Co, 3rd/95th rifles 4 Co)
|
Barnard
|
Large BN, Valiant/Exp SK3
|
Port
(1st/20th foot,
2nd/20th Line)
|
|
|
French OOB Barossa - Marshal Victor
1st DIVISION -
|
RUFFIN
|
|
2nd/9th Legere
|
|
BN vet/exp irregular ?
|
1st/24th Line
|
|
BN vet/exp
|
2nd/24th Line
|
|
BN vet/exp
|
1st/96th Line
|
|
BN amateur (2nd line)
|
Provisional Grenadier Bn
|
|
BN Vet/exp
|
Provisional Grenadier Bn
|
|
BN Vet/Exp
|
Artillery 3x6pndrs
|
|
Vet?Exp
|
2nd DIVISION
|
LEVAL
|
|
1st/8th Line
|
|
BN Vet/Exp
|
2nd/8th Line
|
|
BN Vet/Exp
|
1st/45th Line
|
|
BN Vet/Exp
|
1st/54th Line
|
|
BN Vet/Exp
|
2nd/54th Line
|
|
BN Vet/Exp
|
Provisional Grenadier Bn
|
|
BN Vet/Exp
|
Artillery 3 x 6pndrs
|
|
Vet/Exp
|
CAVALRY
|
|
|
1st/1st
Dragoons
|
|
BN Vet/Exp
|
2nd/1st
Dragoons
|
|
BN Vet/Exp
|
3rd/1st
Dragoons
|
|
BN Vet/Exp
|
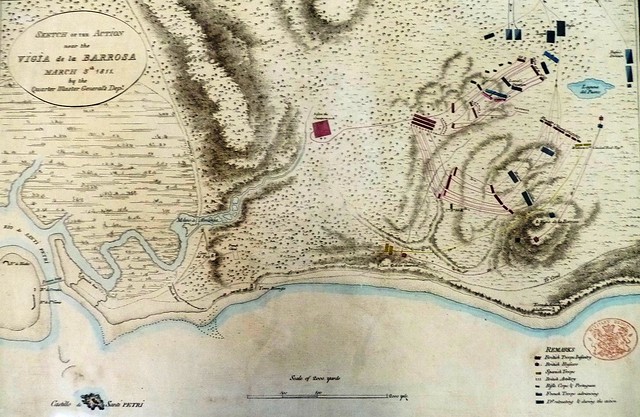
Two main maps were used to create the table for the battle. Slight differences between them, but a general idea of a ridge extending to the east from Barossa Hill, the big forest of Chiclana and the Atlantic Ocean to the west. Both maps have north to the left(ish).
Our rendition of the battlefield. Looking roughly northwest from the southern side of the ridge. The Forest of Chiclana has its boundary marked by the ring of tree bases. A small (fordable) creek runs through the forest. Barossa hill to the left in topped by the ruins of an old convent and the ridge extends to the east (right). The coast road is obvious along the top of the table while smaller tracks lead along the ridge, through the forest and to the south. The ridge was modelled as a series of small hills, but played as if it was a continuous ridge. I retrospect, I think there was too much ground between the ridge and the forest.

View of the table from the north, looking south to the ridge. Dilkes and Wheatley are above the creek in the forest, roughly where the track kinks up. The Y-shaped broken ground is the ravine, played as an erosion gully that provides cover to units within it and impassable to cavalry. Ignore the rogue base of trees that have advanced into the open, who put them there ?
The Opening Phase
The battle opens with the French divisions entering from the table edge near the small lake. Ruffin on the right, Leval on the left from the British point of view. They enter with their dragoons and light infantry (Legere battalion) and soon see the white Spanish uniforms on top of Barossa Hill. They see no redcoats for Browne's battalion is in green. Flushed with enthusiasm, Ruffin advances quickly on the hill with Leval spreading out along the ridge and pushing over it into the narrow flat ground in front of the forest.
The French enter, Ruffin is on the left (south) in this image, in the distance the Spaniards line the top of the hill. The saddle in the ridgeline, where the road crosses, is a bit of artistic licence. No sign of Brit cavalry or infantry yet. The British however have been tipped off by some Spanish irregulars about the imminent threat to their south and Graham hastily decides to turn his two brigades to face them.
The French advance quickly on the hill and over the ridge line, still in column and, it has to be said, in some disorder. Dave watches as the Spanish evacuate the hill and true to the actual battle, KGL hussars provide a rearguard to save them and Browne from the French dragoons. Pete chooses to have Browne leave the hill, again true to the battle, in the face of the overwhelming French force.
MIDDLE GAME
To the left, in the image above, the French have advanced onto the open ground with limited battalions (some still in column) and are now concerned about a squadron of cavalry that have appeared and some British artillery they can spy in the tree line. A large British battalion (Barnard) has also come into view as I release Pete's forces in a trickle from the centre of the forest. In the actual battle, Graham needed time to get his forces facing the French and used Barnard to buy that time.
The retreating Spaniards leave the hill, Browne retreating less hastily. The isolated French battalions in the open ground, above the ravine, obligingly form square in the face of the cavalry threat.
This is where the advantage of a referee enabled the game to work. Pete (Brits) was as bemused by the cavalry as the French (Dave and later, Alan) were alarmed. Historically the French formed square in the belief that British cavalry was threatening them. They had no idea as to the composition of the army they were facing and the 10 british cannon proceeded to cause massive damage to the clustered French. The cavalry were non-existent, but an excellent artifice to confuse both players.
At the bottom of the image above, the Spaniards continue their retreat threatened by French Dragoons who played chicken with the KGL Hussars for most of the battle.
Leval looks out over the open ground from atop the ridge, a battalion in square on the left, British apparently emerging in force from the forest. To his left, Ruffin takes the hill easily
Meanwhile, Browne has retreated from the hill. In game one Pete opted to put Browne in the ravine, in game two he stayed in a more advanced position. In neither game did Browne attempt to take back the ridge in the face of French superiority. Historically, Browne was directed to take back the hill and took enormous casualties, but didn't break. Eventually he was supported by the guards who repulsed several French sorties from the hill and beat them back.
The British, having had time to form up, then advance on the French. In game one, Dave didn't quite organise the French into line of battle and the British advanced up to the ridge quite easily, as seen here. Pete was able to take the entire ridge with the French concentrated around the ruins on the hill. In game two, Alan deployed the French more successfully but was still overwhelmed as the British sortied out to meet him.
Game one, why are all those Frenchmen hiding around the hill, looking at a single battalion (Browne) on the right of the picture, while two British Brigades are about to roll up their right flank ? Why didn't the French deploy into line ? Ah, the benefits of hindsight and the God view of the battle.
Game 2 (pics to come Pete ?) saw better French resistance and some intense close combat along the line, but eventually they broke and the ridgeline fell. With the ridge gone, the hill comes under pressure from the flank and the British can count the victory.
FIN
Two nil to the British.
The French outnumbered the Brits by about 3:2, in cavalry, infantry and artillery, but the sheer uncertainty of the British deployment and shock at seeing them emerge with Cavalry (lol), artillery and infantry from the woods put the French on the back foot. Historically, the Brits swamped the French on the flat and took back the hill by advancing up the ridge just to the east of the top of the hill. They famously captured an eagle. In 1811, Graham's force was so exhausted they were not able to pursue the routing French who escaped back to Chiclana and regrouped. La Pena refused to pursue either Villatte's division whom he outnumbered and beat back or lend support to Graham to ensure a complete strategic victory for the Anglo-Spanish force. After the battle Graham took his troops across the pontoon bridge into Cadiz and refused to acknowledge La Pena. The French reoccupied their positions and the siege continued as it had before. British tactical victory but a French strategic victory.
Pete had played Lasalle before while Dave had played it once. Alan had never played Napoleonics but came to grips with the tactics very quickly. Lasalle in 6mm didn't provide the detailed shots and imagery that 15mm gives, but gave space for two French divisions to face two British brigades. The Lasalle ruleset for combat resolution and play sequence is beautiful and just works. I took some liberties with the advanced rules and let the flank (almost rifle) battalions switch between irregular and regular formation to represent their better (longer range) shooting. Pics from game 2 (Alan) should be available soon and show excellent combat along a line of troops.
Big ups to Pete for providing the venue and 6mm minis, for Dave for playing the French commander superbly and for Alan for showing that a complete novice at Napoleonics can pick up the ruleset and give a good showing. Had the French been aware of their superiority and deployed accordingly, I am not so sure the British would have had a chance. I thoroughly enjoyed getting the battle running and took delight in putting into play historical events like the Spanish vacating the hill without a shot being fired, the british using their artillery to such good effect and the fog of war that affected the French thinking.


