Tuesday 27 October 2020

Great Escape Games Iron Cross WW II Rules Trial

The search for a set of WW II battalion/regimental force size wargame rules that can give us a 'good' game with a result for our evening catch ups continues! We have a few of sets to try out and the first cab off the rank was Great Escape Games Iron Cross WW II.

Here's what the rules 'promise';

I am not going to do a rules review here there are plenty of those on the net already, the idea is to try playing a game in an evening seeing if it can be completed in a timely manner whilst being enjoyable and with a WW II feel!

Scale wise with Iron Cross each base of foot figures basically represents a 'section' (called an element of a platoon) and each vehicle or gun represents that vehicle/gun.

The scenario is set in 1944 setting Brits against jerries. The forces both sides have approximately 400 points of troops and will start on opposite sides of the tabletop, this is a couple of full strength companies each side with support elements. As this is only a short session the game was set at four turns with the side occupying the most 'village' bases on the battlefield at the end being the winner, unless off either side takes such losses it breaks!

Okay to it! Each turn the first player is picked by a D6 roll off, the Brits get away with the initiative on turn one! They advance as fast as they can to move on a board front and with the Germans out of line of sight do so successfully with no intervention. Then the Jerries have their go and are a bit more ambitious, leaving some platoons moving slowly forward in groups others dashed far ahead and occupied a couple of the villages. Cleverly the Brits held back some of their commands and used them to interrupt the Germans getting some shots off and inflicting losses (morale hits).

Turn two and the Brits again get the initiative. This turn though the play turns over more often as both sides, move, fire and rally their men. The British occupy the last two unoccupied towns so both sides have an equal number of these, time to see how easy it is to capture some urban real estate! Turn two sees the first units 'destroyed' both sides losing an MG support element.

Turn three and the Brits are again first off the mark and they concentrate mortar fire on a German platoon in a town whilst bringing infantry with armour support up. Both sides used their commands up in bulk activating each element in this sector over and over trying to inflict casualties while rallying off morale hits almost as fast as they were incurred! The hammered Germans still held the town at the end of the fight and with both sides units 'spent' around the village they each manoeuvred their other units into advantageous attack positions for the nest turn while exchanging fire.

Last turn and finally the Germans got the initiative. It was their chance to get an attack in first! They pushed infantry and two Panzers up to attack Brits in a village but a timely British reaction saw the infantry get a good shot in with a PIAT and they brewed up the leading Panzer! The weakened Germans then pressed their attack again getting a lot of hits on the Brits but unfortunately for them not enough to gain an advantage. Across the rest of the front the rest of both sides elements again moved and fired but overall to no major effect.

So a draw but really with equal forces on a tabletop with terrain placed in an even manner and only a few turns what could be expected. The real result is a resounding yes to the question, would these rules work for us for a Monday evening gaming session. I will schedule a game in for sure to get everyone's feedback!

The initiative system is the jewel of the game, you can use your commands very liberally and it is good that you have the chance to activate a single element to move and fight repeatedly (with a diminishing chance of a successful activation with each attempt) and push an advantage great stuff, but it will mean other elements will have to sit idle for the turn! That said there are some holes in the rules, no off board artillery support, no air support, very generic foot units and standardised vehicle types and movement (none of these are not insurmountable without a few house rules). Lastly the rules could have benefitted from adding a few more pages so there would be more clarity on what is included! I can understand while these rules have not taken off, what's there is great but its what's not there that make its appeal limited to a broad audience, you shouldn't have to buy a set of rules and have to house rule them to make them complete!

Some pictures of the action!

Two British Platoons deploy with armour support, each infantry base is a section, the red mini die represents a PIAT armed unit, the small bullet is a single command and the large bullet is a platoon move, you can move 3 sections for the cost of one command but that is the only action allowed that turn...

Germans advance their centre...

British infantry with armour support attack Germans occupying a village...


The panzers advance...

...supported by the battalion mortars, the blue mini die show the number of shots at a specific target, accuracy improves with each barrage!

Only for the British to take one out with a PIAT!
Multiple small bullets show the number of commands that unit has used...

With their armour stalled the German infantry find it beyond them to push the British from the village!

A British platoon occupies the high ground, the white mini die represents morale hits taken...

Blitzkrieg Commander II is the next set of rules to 'test drive'...

Saturday 17 October 2020

Wild West Town - Building One In 1/56 Scale!

We have only played Dead Man's Hand once but it was such a hoot and the reaction so positive we knew we'd play more often and of course what do you need to play an Old Wild West game but an Old Wild West Town!

Before I go into the details of construction here is the town all laid out!
The street width is pretty wide but can be adjusted and does allow easy game play...

I was in two minds when it came to this build, do I make just facades and have a Hollywood town or make complete buildings, well I went with the latter! 

I figured we'd need; a Saloon, A Bank, a Post Office A US Marshalls Office, a Blacksmith with adjacent 'Corral', two other miscellaneous Buildings and a railway Platform. Big ask from scratch. I had a Battlefield laser cut Shearing shed which could easily be a blacksmiths or a building under construction and Al (our master craftsman) said he had a Wild West Saloon already built great news!

My on hand parts included; 2mm 1mm & 0.5mm sheet styrene, pop sticks (ice-cream sticks or coffee stirrers to others), wood skewers, some roughly cut squares of thin wood, a piece of Masonite and some balsawood.

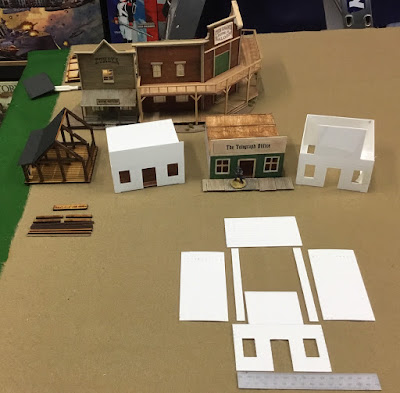
Here's my initial work, a floor of pop sticks dictated the building size...four slab sides and the usual Wild west high front for signage...

A door and windows only on the front wall only and it would be topped with a flat roof. I scored the sides at 5mm intervals to give a planking effect...

Okay so I had cut parts for; two buildings 10.5cm x 12cm x 6cm, two buildings 12cm x 12cm x 5cm, one building 16cm x 12cm x 6cm (only one with a peaked roof) and a railway platform 22cm x 6.5cm x 1.5cm and the building frenzy commenced. At this point Al brought over his magnificent Saloon/Hotel with a store along side it. Crickey it was good and surprisingly was a façade only, the very construction type I was going to do initially DOH. Doesn't matter it will all be fine on the gaming table!

Here's the basics of one of the buildings cut from 1mm sheet styrene...

In this picture the scored wood planking can easily be seen, the only issue with this technique is it causes the sheet to curve hence the bulldog clips required to keep things looking square!

The production line in full swing with Al's beaut Saloon in the background...


...and of course the railway platform...track is also from Al's great terrain stash!

All the details such as windows, door frames, signboard edging were cut from 0.5mm sheet styrene. For the signs I downloaded a free Wild West Font called Western Bang. The bases are cut from Masonite and 'flocked' with sand...

A close up of Al's Saloon and Mining store, unlike my rough buildings this was painstakingly made from balsawood with delicate detailing!

Some figures testing the lay of the land!


Hope this inspires others to crank out their own buildings!

Stay tuned for a game (and town name) soon!

Wednesday 14 October 2020

Chain of Command AAR USMC vs Japs!

Recently we played a PTO Chain of Command game, USMC against the IJA, Dave wrote up the below AAR...

In the shadow of Kolombangara - New Georgia, Solomon Islands, late 1943.

After the long fight to secure Guadalcanal in late 1942 and early 1943 the drive up Solomon Islands was commenced to secure the left flank of Nimitz's drive across the central Pacific.  Key objective was the island group of New Georgia in the south-central Solomons. In the shadow of the volcano Kolombangara, USMC and Japanese troops fought without quarter for this remote corner of both tropical paradise and hell on Earth.

2nd Platoon, Baker Company has been tasked to reconnoitre and secure an area of ground in the island group. Dense jungle, limiting visibility, broken by some low hills, rocky outcrops and swampy ground. 

The Japanese score very highly on morale as these are fresh troops confident of victory. The USMC are tired and score low on morale but highly on support weapons. So the stage is set for the spirit of Bushido versus firepower.

1st, 2nd and 3rd squads deploy left, centre and right to find, contact and engage the enemy. 2nd squad push forward first in the centre, detaching a two-man recon team to their left who are quickly taken under fire by the defending Japanese from what appears to be a bunker and a rifle squad.


The 3rd squad deploys on the right near a swamp and commence firing on another bunker and rifle squad of Japanese who seem reluctant to return fire.

 
The 1st squad deploys on the left and begin to manoeuvre to take the defenders in the flank, when they too are hit by heavy fire from what appears to be yet another bunker and rifle squad, which kills two of the squad in the opening bursts.

 
Support teams and platoon command begins to arrive with Sgt Stryker, a Guadalcanal veteran bearing a more than passing resemblance to John Wayne, situated between and behind the 1st and 2nd squads to the centre-left. The lieutenant is positioned to the right, nearer the 3rd squad, to direct the firing and movement of the support teams which are deployed to the right side in support of the 3rd squad. They are the closest to the enemy they are engaging and seem to have the best chance of taking their position and turning the defenders left flank. 

Well directed Japanese mortar fire begins raining on the 3rd squad who are slow to organise their support teams of a flame thrower on loan from the Aussies, and MG's. However the platoon mortar team brings fire on the left flank of the Japanese behind the swamp.


The 1st squad on the right begins falling back and under the barked orders of Sgt Stryker, prepare to pass behind the 2nd squad in the centre to reinforce the main assault on the USMC right. However their progress is hampered by the jungle terrain and Japanese opposing them gamely move forward to continue to bring them under fire. The 2nd squad in the centre remain engaged in their own firefight, steadily taking casualties.


3rd squad on the right are whittling down the opposing Japanese across the swamp but taking casualties of their own from accurate mortar fire despite one of the mortars running out of ammo. The 3rd squad is lucky as the Japs do not seem to have enough command and control to return fire with the rifle squad. The USMC platoon support weapons are slow to join the action but once an MG joins the fight it is quick to take effect. Eventually the flame thrower team reach a firing position and take out the bunker from longer range. The 1st squad are too slow re-deploying across the centre-rear to support 3rd squad on the right.


The US morale has been reduced by losses but the Japanese morale has hardly flagged despite the loss and rout of the squad on their left flank. It has taken too long to reduce the Japanese left flank and night falls so USMC advance is halted, having not achieved their terrain objectives for that day.


The lieutenant is summoned to the Company CP for a chewing out and both sides settle in for an uneasy night in the jungle separated by only a few tens of yards. Today Bushido has triumphed, but eventually firepower will carry the campaign.