Sunday 20 November 2022

Meeting Engagement Scenario AAR - Great Escape Games 1914 Rules

Catching up with some old TSOG nights! October 3rd George and I played a WW I game using 1914 Rules.

German Uhlans Deploy and prepare to charge!

We used the Meeting Engagement Scenario, we varied the victory conditions slightly in that calculating victory was as per the scenario rules but to be able to win the side calculating the winning conditions must have at least 4 bases within 4 inches of the bridges in the centre of the battlefield.

George commanded the Russian force and I led the Germans. With only two of us both playing we didn't get as many pictures as normal!

The flow of the action!

The Game

The Russians adopted a central approach and raced for the bridge, they sent their cavalry off to cover Germans on their left.

The Germans refused their left and sent two Battalions in on their right and the rest of their force in the centre.

Both side used their cavalry to screen their infantry which was a successful tactic. The Germans brought on their reserves on in an ad hoc Battalion giving them a strong reserve whereas the Russians brought their reserves on in Company Units and they moved to join up with their parent Battalions. The German choice was the better idea in the short term and gave them a strong Unit instantly, on the other hand the Russians were able to reinforce their weakened Units later in the game and this was crucial as it saved them losing full formations which affected the victory conditions!

The forces on the far flank engaged and the Russians scored a minor victory here, their cavalry pinning two German Battalions thus weakening their centre.

To the left and right of the town and bridges the Germans were successful in destroying several Russians Companies and pushing them to the brink of breaking while the Russians in the town picked off Germans enjoying the protection it offered.

The last turn began and the Germans gained the initiative, they fired along the line and the Uhlans charged inflicting many hits on the Russians but failing to destroy the single Company they required to break them (in hindsight instead of charging the Uhlans would have been better used riding up and dismounting and firing at point bank range  but hey who can resist a chance to launch a cavalry charge!). Now with the Russians in control of the turn they loosed volley after volley on the Germans and the casualties were sufficient to break their morale, the men clad in grey retired from the field!

A Russian victory!

Some Pictures
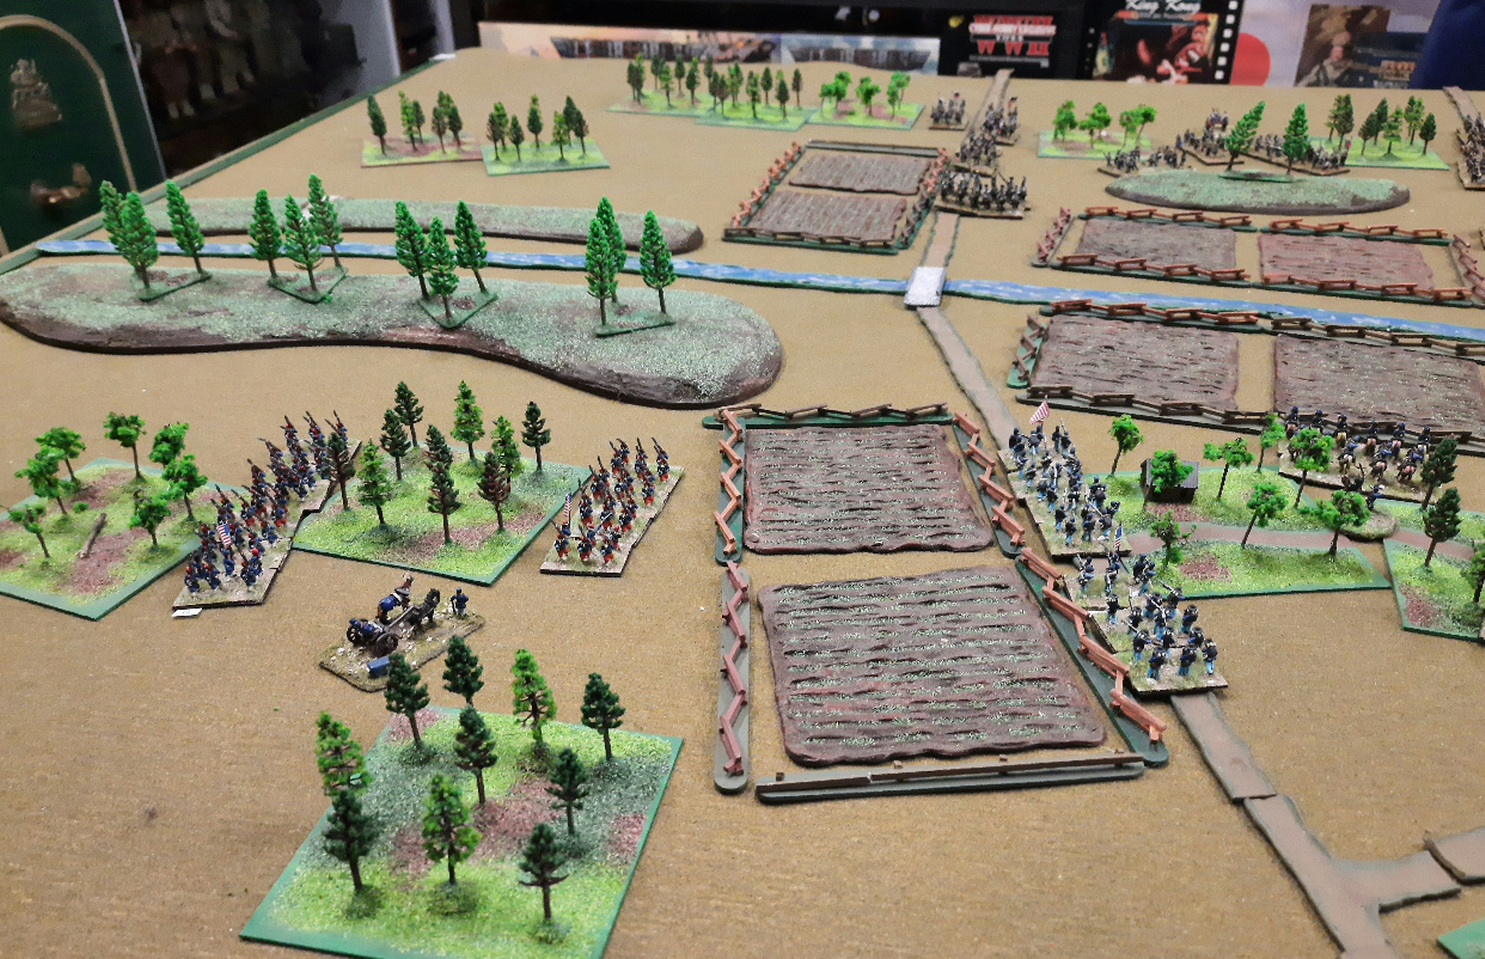
The Germans centre about to advance!

The Russians advance, this is midway through the first turn...

Blurry Germans occupy part of the town near the bridges they were destroyed on the last turn of the game, to their left is a German cavalry screen. The bullets represent command tokens spent, the mini die is the number of hits on the adjacent base and the round counter is numbered on the other side and records the number of command tokens allocated to that unit for the current turn, we find this better than using a roster sheet...

The two battalions on the German right were roughly handled by the Russian cavalry keeping them out of the action around the town and bridges...

The game ends, these Russian Units were facing Germans but they destroyed them breaking the German forces morale!

As usual we had a great game and on the final turn either side could have won, luckily I gained the initiative! I spent all my command tokens attacking to the limit and was one base short of breaking the Russians, George used his commands well and broke the Germans with a few to spare!

BTW I like these WWI Pendraken figures and one day will look at expanding my armies to include the Western front 1914!

Friday 18 November 2022

Mahdi Here? Go Away With You! - A Men Who Would Be Kings Rules AAR

This fortnight we visited the Dark Continent and a period of enlightenment as Her Most Glorious Majesty Queen Victoria's army attempted to bring civilisation to the locals (?!?)...yup time for another the Men Who Would Be Kings rules game!

Dave and George commanded the Mahdi force and (poor) Maurice the Egyptian Army.

The Scenario
We choose Scenario G; It's Awfully Quiet Out There!

The Attackers
Mahdi
Oman Dirka '7' Yellow-Bellied
1 x Mahdi Tribal Foot – Fierce
4 x Mahdi Tribal Foot
2x Mahdi Irregular Foot – Poor Shots & Limited Ammo/Fierce
1 x Field Gun – Poorly Drilled & Limited Ammo

The Defenders
Egyptian
Colonel LongJohns '5' Shirker
1 x Regular Infantry – Unenthusiastic
1 x Egyptian Irregular Infantry
2 x  Egyptian Irregular Infantry Poor Shots
1 x Egyptian Machine Gun - Poorly Drilled

Please note from our previous experience we now play The Men who Would Be Kings with the below House Rules;
1. All Pinned Units retire half a move when initially Pinned and act as Gone to Ground while Pinned (note ALL Units GTG and for the whole duration of being Pinned).
2. If a Unit with multiple Pins fails to Rally reduce the Total Number of Pins by 1 for each failed Rally attempt (Units will always retain ONE Pin until Rallied).

The Game

The Mahdists had a cunning plan, whilst their firing units the Irregular Foot and Field Gun entered the table top for one side to pin the defenders down with a hail of shot all their Tribal Units entered from the other with the deadly intent of just rushing forward. The Defenders plan was to hold on at all costs.

Turn 1 and the onrush started whilst two Egyptian Units deployed at the rear of the Column the British formed up into close order on a slight rise by the road and the Gatling Gun opened fire felling the first of the attackers.

Turns 2 to 4 saw the Mahdi plan unfold their fire knocked out half the Gatling crew and a couple of Egyptian infantry whilst their Tribal Foot closed in some stumbling on the rocky open ground (i.e. failing their activations!). During this time the poor fire power of the Egyptians showed as they scored only a few hits whilst their British Brethren in Close Order cut a swathe into the charging Mahdi who much to their Colonel LongJohn's dismay passed their Pin Tests!

Turns 5- 10 with the range closed the Natives proved their worth in hand to hand combat. The defenders did score some small successes including the decimated British Unit who were forced from the high ground counter attacking successfully pushing the Mahdi back and not only retaking the rise but almost eliminating their foes! Elsewhere though it was a blood bath with three defending Units destroyed. 

Night fell ending with the British holding (just) their position and the Mahdists retiring into the desolate scrub from whence they appeared. A third of the attackers became casualties and two thirds of the defenders fell, it was a true blood bath and the sands truly turned red!

Both sides claimed victory but looking at the victory conditions it was a decisive victory to the Mahdi!

Some Pictures

The Egyptian Column notices movement in the distance the troops are called to arms!

A close up of the Column, this is the Egyptian figures first game!

The Mahdi Riflemen quickly approached and started a steady and deadly fire...well not really deadly but they did cause enough casualties to make the Tribal Warriors task a bit easier!

The defenders deploy!

An overview of the battlefield as the Mahdi encircle their foes!

Oman Dirka leads his right wing as they charge the Egyptians!

The Mahdi right wing looking ominous advances!

The first hand to hand clash, Tribal Warriors overwhelm the remnants of the Gatling Gun Crew...

The Mahdi plan continues to unfold, the Riflemen and Gunners target the rear of the Egyptian Column...

The Mahdi rejoice as the defeat the British Infidels on the high ground!

The British Regulars are pushed off the high ground taking heavy losses...

...and then recapture it in turn inflicting heavy loses on the Mahdi...

The rear of the Egyptian Column is wiped out, what was three Egyptian Units is now a sea of 'death markers'...

With an aura of invincibility the remnants of the British Unit hold firm beating back their attackers...

Natives roaming the battlefield seeking to finish off the defenders...

The surviving defenders, one intact Egyptian Unit  personally led by Colonel LongJohns and in the background the two remaining figures of the British Unit standing firm on 'the high ground'...

The overall battlefield after the action concluded, not the most exciting terrain but functional...

The Result and Fallout

So a Mahdist victory and an ominous debut for my Egyptian figures!
Madhi VPs 9
British VPs 3 (including a 1 bonus for holding the high ground in the centre of the table!)

A great game but from the start it looked that it would be a hard one for the British (Defenders) I wonder how many time these TMWWBKs Scenarios were tested. We like these Rules but after each game discuss the Pin Rules and after this play there will be a positive modifier of one for Units taking Pin and Rally Tests in physical Cover (so not just GTG). As usual the game played fast, was fun and despite the odds the Defenders clung on disparately! I plan to replay this scenario with the same forces using the Triumph and Tragedy Rules Colonial Rules one day and see how they compare.

Catch you all soon!

Tuesday 1 November 2022

Wings of War WW I Session

Last night two intrepid TSOGgers donned goggles and silk scarves strapped into their fragile fabric and wood airplanes and took to the skies over France circa 1917!

Using one of favourite sets of rules Al and Dave spent an entertaining evening engaging in some serious dog fighting...in the end in gentlemanly spirit it was decided it was a draw between the Entente and Central Powers!

Some pictures from the night...great model's on Alan's great home made terrain mat!


Well we really need to catch up on the Blog there are several game pictures sitting on our phones! Plus I need to address Captain darling's Blog, I have several things to post there just been a tad busy with 'real' life! Catch ya all soon!

Tuesday 12 July 2022

Trench Hammer War Game Rules Test

Hello! We have yet another set of rules we're having a go with, Trench Hammer. These are designed to cover tactical WW I warfare. These are similar to From Shakos to Coal Scuttles in that they are simpler and more streamlined than other rules, they also are a bit of a sandbox you can tweak them without breaking them!

This is not a full review but our general thoughts. Overall we like what we have here;
  • Initiative roll each turn
  • A die roll to determine command control each turn
  • Alternating activation during the turn, one side activates a unit (squad, single gun or vehicle)completes it action then the other side has a go until all commands are complete
  • Long Rang fire, short rang fir and then very short range close combat, with the latter two surviving targets shoot/fire back, all use the same system with different modifiers
  • Units accrue damaged (usually up to six points worth) before breaking, there are a couple of options to rally those points off
  • Officers at their risk can try extra actions
  • Covers Rifle Grenades, HMGs, Armour, Special Troop Types, Mortars and Field Guns 
Need to add;
  • Force Morale
Our 'game' was hypothetically set in the Caucasus, Mounted Aussie Light Horse and British Yeomanry supported by a (sort of) Hornet tank went up against a mixed Russian and Arab force. The tank (as it should be) was a powerful machinegun platform and unfortunately for the Russian they couldn't get their gun into action against it! Th Yeomanry fared badly in the initial advance but both the Arabs and Russians were slowly ground down by the tank with Light Horse support.

The Entente advance, George's mounted troops looked great!

Despite losses to the Yeomanry the advance ground down the defences, here the Arbs have been dispersed the Entente have occupied two buildings and the Russian gun is unable to get a shot at the Hornet!

Dismounted Aussie Light Horse deploying behind Lt Bruce's abandoned car...

The last of the defenders realise the 'jig is up'!

This game with 7 Entente Units against 8 Caucus Army Units played very quickly and we only really referred to the rules early on for the firing modifiers (which we pretty quickly memorised). These are a good set of simple rules that you can add as much chrome as you want to for a night of cut and thrust action. They could really be used for fights from the late 19th century to the Inter War period. At some point we'll list our modifications! Thanks for checking out the TSOG Blog!

Wednesday 29 June 2022

WW I Wings of War/Glory Session...

Monday night due to Covid19 Quarantining we met at Dave's place, Great War Wings of War/Glory was on the agenda! The beauty of Wings of War/Glory is the playtime, we got three games in on the night and plenty of time for coffee/tea after! So each of us had a go as the bomber force!

The Mission;

A Caproni Ca.3 with a Nieuport 17 had to carry out a bombing run over a town AND return to the entry area.
Three German planes were tasked with shooting down the Caproni, two Albatrosses and a Halberstadt comprised their force.

The Outcome;

Game 1 Entente Victory
Game 2 Central Powers Victory
Game 3 Entente Victory

Some Pictures;


Very enjoyable! For some variety we had some random cloud movement this time and it worked well, the clouds movement was controlled by a scatter die and and D3 (six sided die with result divided by 2 rounded up).

Saturday 4 June 2022

ACW AAR - the Battle of the Bridges - FS2CS Rules

With the great success of our ACW Test game using the From Shakos to Coal Scuttles Rules last Monday we played a two player game fielding two 12 Unit equally balanced forces in a meeting engagement! The objective of the game was to be in possession of the two bridges on the tabletop at the end of the game or break the enemy! We included the Exhaustion Rule this time to cover the 'breaking the enemy' victory condition and boy was this rule was telling in the exciting climax of the battle!

Confederate Gunners at work targeting Yankees...

The Forces

The Yankees;
1 x Command base Brigadier Copley
2 x Veteran (Elite in rules) Regiments - 3 bases each
5 x Trained Regiments - 4 bases each
1 x Raw Regiment - 6 bases
1 x Cavalry Regiment - 4 bases
2 x Artillery Batteries Early Rifles - 1 base each

The Rebels;
1 x Command base Brigadier Neudegg
3 x Veteran (elite in rules) Regiments - 3 bases each
4 x Trained Regiments - 4 bases each
1 x Raw Regiment - 5 bases
2 x Cavalry Regiments - 4 bases each
2 x Artillery Batteries Smooth Bores - 1 base each

The Battlefield

The Confederates started at the top of the below map and the Federals at the bottom.
The Rebels concentrated in the centre of the battlefield while the Yankees advanced on a broad front!
.

The AAR

While a great battle raged the Leaders of both sides recognised the importance of two bridges over a stream that should be occupied to allow the easy transit of artillery and wagons in that area. Each side assigned troops to occupy them!
CSA Brigadier Neudegg was confident he could accomplish his task easily advancing on a narrow front his horsemen leading the way whilst the Union Commander, Brigadier Copley advanced his forces on a wide front with strong flanks hoping to envelope any opposition he may encounter while carrying out his mission. Importantly just as the battle commenced the Confederate Commander was incapacitated leaving the Southerners with no one in overall command giving the Yankees an edge!
The Southern horseman arrived at both bridges before anyone else, one Regiment  dismounting while the other remained mounted and ready to charge! Union infantry engaged both of them and under fire the cavalry retired from the crucial bridges.
Rebel infantry replaced the horsemen and a race to occupy the best positions along the stream began! Once in place the Regiments of both sides deployed into line and engaged their opposition! A frightful firefight commenced, the infantry exchanged volley after volley resulting in significant casualties! Several units suffered badly wavering and then falling back. The battle was in the balance as the exchange continued.
Then a great Hoorah emanated from the Union right flank a brave Regiment charged defeating the Rebels they faced and with artillery support they started rolling up driving in the Rebels line! The deadlock was broken s was the Confederate morale! The Southerners fled followed by the enthusiastic cheers of their Union foes...Hoorah!

Some Pictures...

The Confederates advance, their two Cavalry Regiments can be seen scooting ahead of the infantry toward the bridges!

The Federal Right moves forward...

......as does their left!

Brigadier Neudegg leads from the front during the approach and was injured, he was 'hors de combat' for the rest of the game, his Command Dice was lost! 

The Yankee centre advances.

View from the Confederate side as their Cavalry dismounts at their objective, the right hand bridge...

The same dismounted horsemen were driven back by two Regiments of Union infantry!

At the other bridge more Union infantry fire drove the Southern Riders back!

Rebel Infantry replaced their mounted brethren and crossed the left hand bridge putting pressure on the Union line.

Meanwhile the Union right flank attack started to pose the Rebs some issues!

A Southern Regiment also secured a stone wall near the bridge! Just beating a Union force there!

The Union upped the ante in this section of the field when one of their flanking Regiments started to envelope the Confederate position.

Flanked and under artillery fire the Rebels were driven back across the bridge and forced from the stone wall position, the Confederate left was literally in great disarray!

The Confederate right despite being pushed back from the bridge looked in better shape and were deploying into line to face the Federals!

A Confederate Regiment took position on high ground on the extreme right of the line and their volleys pushed back the Rebs facing them.

The Yankees left was preparing to launch an attack with a fresh Zouave Regiment when events on the other flank of the battlefield decided the action, the Confederate troops exhausted began to withdraw...

The end of game positions the broken Rebels are toward the top of the picture! 

A very close battle! Both sides were destined to break on Turn 8 due to their high levels of Disarray so whoever gained the Initiative for the turn was in big trouble. Dave and his Confederates drew the short straw and went first and at the end of the player turn the Rebels  reached their Exhaustion Point! The game played well and very quickly, once the basic rules were mastered we only had to check them occasionally! Our ''ACW period adjustments' worked well so once we get a full team of four players at a session we'll be playing a super 24 Units a side battle...I can't wait!

Just a point on the Exhaustion Rules, it reads as follows...
...with so many Units on the table we think the base level of 12 is too low unless we played an extraordinary battle on the night. Based on our experience we think with armies of 12 Units you should try 18 as a base and work from there, anyway that's what we'll do next time! This game both sides high level of disarray by Turn 8 saw them both set to roll over twenty dice each for their Exhaustion roll!