Monday 20 April 2020

A Life on the Ocean Wave

Some say Cornwall...I say Barbados

Some more action to keep the wolf from the door...or at least enough for a doggy flap to ensure the wolf only comes in if he behaves himself

Cornwall or Barbados - somewhere the Royal Marines are clearing the land of piratical influences

Read on for a play test of "Smooth and Rifled"

Report of Able Seaman Scatty Kat and Seaman Will "The Legend" Thompson. As dictated to Ensign Thomas Frogmore-Richard RN (Spelling corrected  by said Frogmore)

Me and Will are gunners on the Shamrock as you know. Captain Arnicle had said we was to clear this island of pirates. Lieutenant McGuiness said they was going to need a gun and some marines to do the job.

Me and the lads instantly volunteered to take  Betsy (one of the 6 pounders) along for the hunt. We'd been hunting pirates around these parts for a while and they weren't up to much.

We set out in the longboats : me and Will and the other lads hauled Betsy along the beach and up the track after the Captain and his matelots who had also volunteered. There were four of them and they was to keep a good guard over the Captain. Otherwise they would feel the lash Ensign Frogmore said.

Lt McGuiness had 10 Royal Marines with him in the shore party. They was the only ones who didn't volunteer but then again they get paid a whopping amount and do this all the time.

From the crows nest on the Shamrock Toby Mintblohm painted a good shot of us lads approaching the pirates den.

There's Will and the lads with the gun, then the Captain with his Matelots, then Lt McGuiness and the Marines.


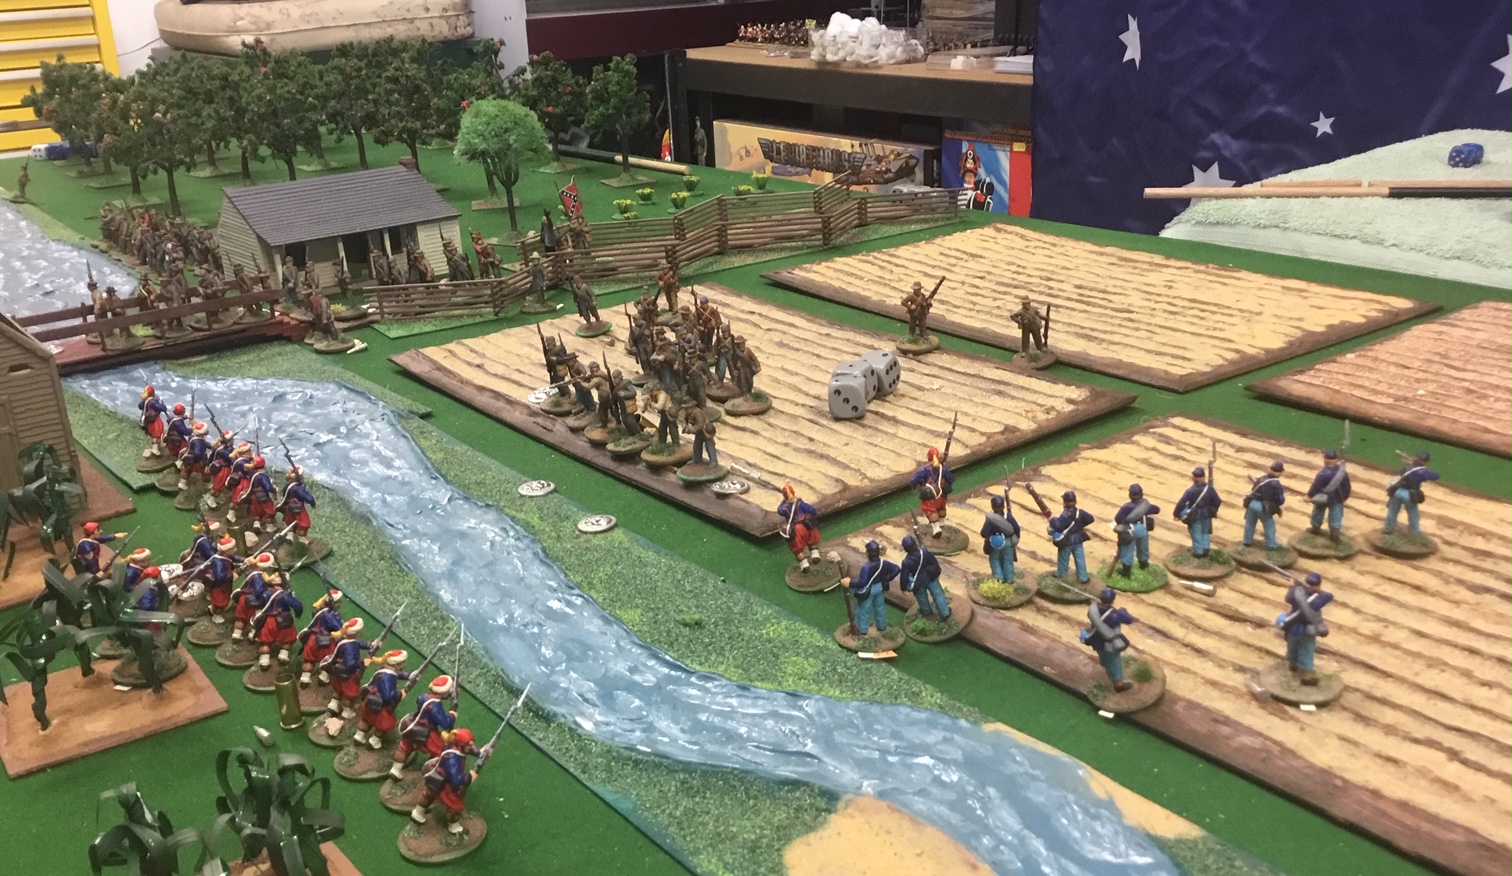
This is what we could see through the tree cover. I thought there was probably three groups of them and a ships canon. I didn't see the ones in the house at first but as we moved forward they started to come outside and Will said he seen um.


You can see us starting to lag behind a bit. We can only move as fast as the lads can haul the gun. The others are spread out and can move faster. The Captain yelled out that he was going round to the right.


You can see the Pirates moving out of the house and barn. They all move as a group but from what we've seen before, they can't fire as a group...useless sots.
The Captain circled around the bottom of the little knoll and it was clear he was gonna wait for the devils to come over the top and then blast them. His Matelots had some of those new blunderbusses. Mostly the Pirates we've seen have had pistols and cutlasses and not much else.


Now you can see the Pirates getting on top of the little knoll and the Captain telling his men to aim. This was gonna be good. The Lt had formed his marines up into a two deep firing line and was about to start a slow and steady firing advance. The Pirates weren't gonna get out this intact....those we don't shoot we will hang.

I didn't see what happened next but there was an almighty crash and the Captain and three of his men slumped to the ground dead. The Pirates had come up in two groups and as the Captain was getting ready to pot the first group, the second one got up close and stuck it to him. I got the lads to wheel Betsy about and we loosed a single ball at the Pirates. It took out three of them. We'd aimed at the one in front but the ball passes backwards in a sort of rectangle. They didn't look like they was gonna stop so I didn't think we could reload the gun in time. 


I was right. They didn't stop. Two of them raced down to young gibbons who had been wounded but was still on his feet and came at him from both sides at once. He didn't stand a chance.

The rest came at us. There were four of them and four of us so we thought we could handle them as long as their friends didn't join in.


I took out one of them with the pikestaff but they got Markyboy.


As I thought their two mates joined them and we looked like we were in trouble for a minute. Will took out one and Steve took out the other. But I had two in front of me...and I couldn't land a blow on them. But once Will and Steve joined in we had them on the run. The last one who looked like a leader ran back toward the trees and fired a parting shot...catching Steve in the neck. There was just Will and me then. We ran back to the gun to see what was happening on the other side. We could hear gunfire and then a lot of shouting. We was hoping that the Marines were giving the Pirates a right seeing to.

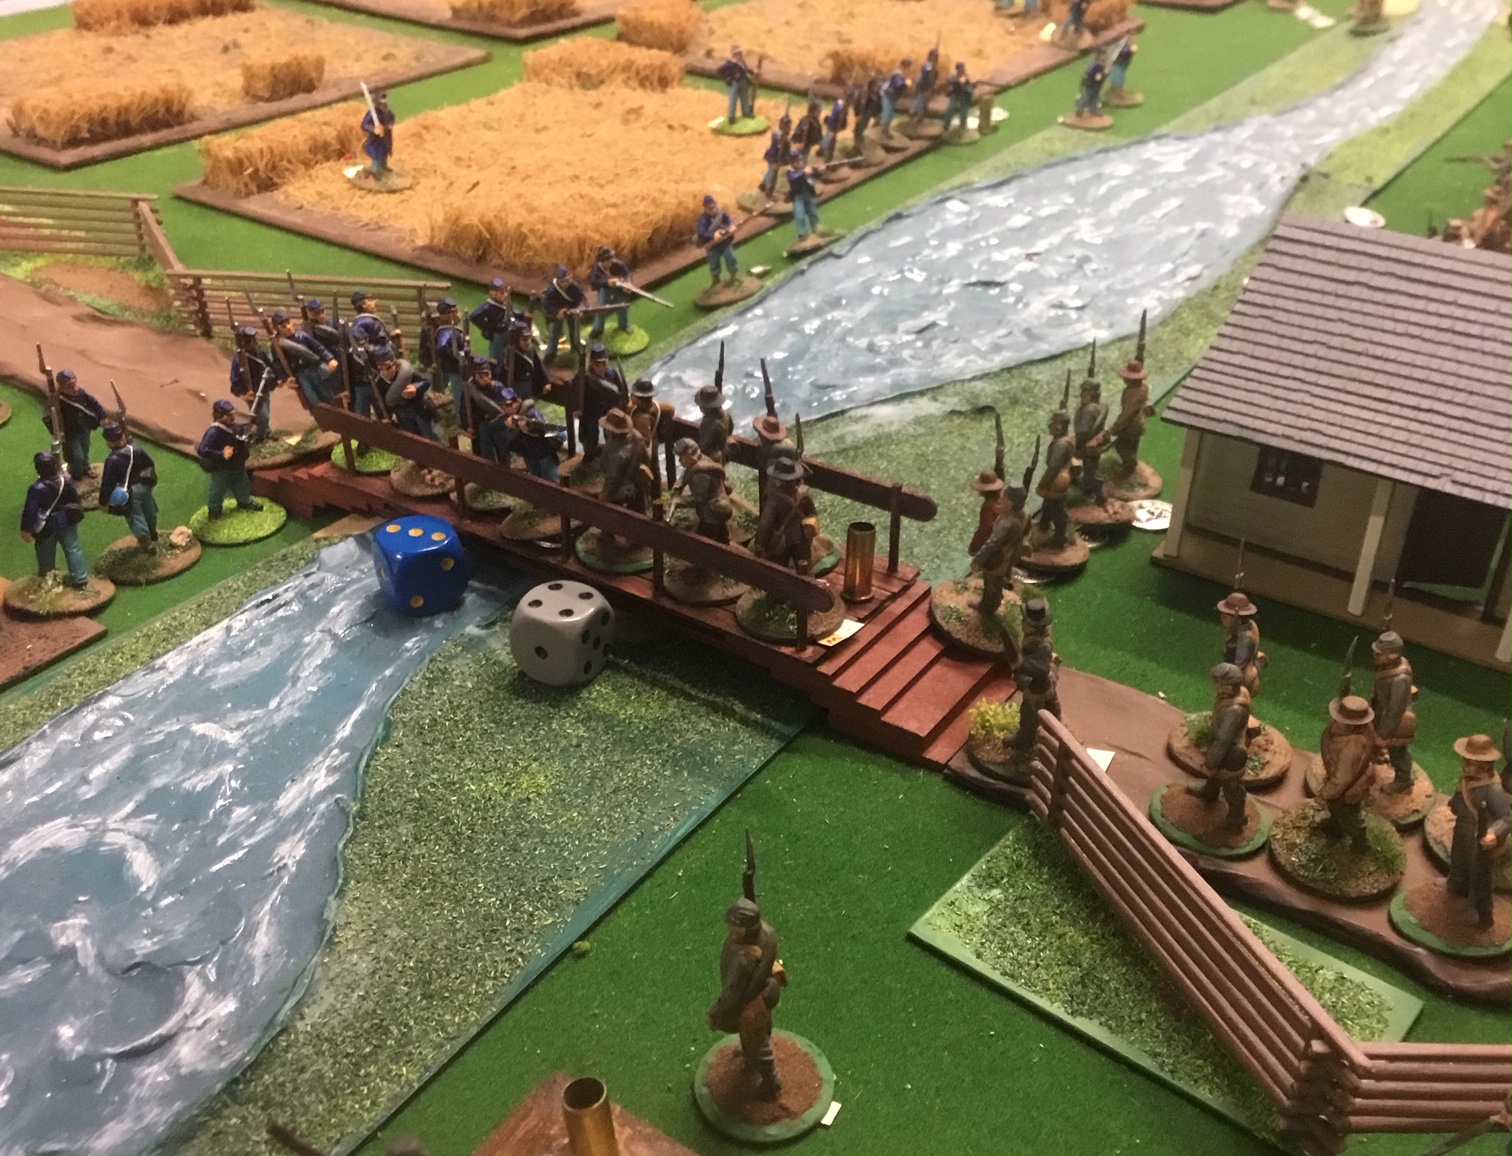
When we looked across we could see that the Pirates had fired off their canon and it had taken out the Lt and several of his men...a lucky shot....it must have been a canister of shrapnel but the range looked too long. I think it was just a lucky shot.

The Sergeant at Arms (Kittle I think his name is...or was) reformed the line and advanced toward the second group of Pirates emerging from between the little clumps of woods. He got off a volley but it wasn't a good one. I think having the Lt and most of the rear rank blown away didn't help. We could see another group coming around the other hill. The Marines were too far forward and they were gonna be in trouble. We couldn't move the canon with just two men and it was going to take forever to reload. We started but we couldn't do much.


The Pirates charged across the little clearing taking advantage of the fact that the Marines had loosed off a volley and not yet reloaded. That didn't stop them meeting the charge with fixed bayonet. The Master at Arms got two on his own and they cleaned up two more. I could see one young Marine trying to fight two at once and not winning.


Just as the Master at Arms was rallying his men the second group raced in and hit them. Almost everyone was fighting two and three Pirates.


With those odds the result was inevitable. He held off a couple but he lost three men. The survivors moved back toward the clump of trees to get some cover and to protect themselves.


The Master at Arms was hit leaving two of his men surrounded by screaming barbarians.


It didn't take long to finish them off. Will and I looked up. It didn't look like the Pirates were going to come for us. They looked like they was getting their dead and wounded and fleeing back to the house.

Will and I thought we better do the same and started pushing Betsy back to ward the long boats. We got her on board and rowed back to the Shamrock. The rest is what we've said in this statement.


You can see all the bodies. If we'd had more Marines or the Captain hadn't been ambushed we would have had em. You can't do much if lady luck isn't with you.

Signed

X
Kat

X
Thompson

Sunday 19 April 2020

61-65 Rules - 1863 ACW Skirmish Scenario & AAR 6

Late June 1863 the Southern Boys of Major General Early’s Division of the Army of Northern Virginia advanced through York towards Wrightsville with the intention of securing the bridge located there to enable a crossing of the mighty Susquehanna River! Hastily organised Federal Forces were organised to face the Confederate invaders and clashes occurred!

At one small but steeply banked stream north east of York soldiers from both the North and the South searched for a suitable place to cross. With the hot afternoon sun beating down on the men clad in blue and grey a small footbridge with nearby fords was discovered and spot quickly became the focal point of their attention. It was not long before shouting and the crack of gunfire broke the serenity of that fateful summers’ day... 

The climax of the action to secure the crucial bridge near York is reached, Yankees and Rebs charge and counter charge...

Scenario Forces;
Both sides have an 1863 'Company' as outlined on pages 28 and 29 of the 61-65 rule book.

Federal Force
A Captain, a 1st Lieutenant, a 2nd Lieutenant, a 1st Sergeant and 4 Sergeants
8 men squads; 2 Veterans, 5 Volunteer and 1 Volunteer Militia 

Confederate Force
A Captain, a 1st Lieutenant, a 2nd Lieutenant, a 1st Sergeant and 4 Sergeants
7 men squads; 3 Veterans and 5 Volunteer.

Set Up/Special Rules;
The 6’ by 4’ table was divided in half long-wise with a stream that can only be crossed by the central footbridge and 2 fords either side of it near the table edges, fields, both fallow and with crops and a orchid are astride the stream with clear banks and a farm and barn are near the bridge.

Both sides enter the table from anywhere along their allocated 6’ side, decide randomly. 

Decide which side goes first in Turn One randomly.

Buildings can only be occupied by skirmish pairs, up to 4 pairs can be in a building an a maximum of one can fire per building side (up to 45 degree LOS from wall corners), re sides without windows the skirmishers will create 'loopholes' automatically.

Victory Conditions;
To break the opposition side;
Federals break once 30 casualty points are accrued
Confederates break once 28 casualty points are accrued
Occupation the footbridge increases that sides casualty point total by 5 while decreasing the oppositions by 5, if both sides have figures on the footbridge the side with most controls it.
Note - control of the footbridge is included to ensure both sides get to grips quickly!

The AAR;


The Yankees got the initiative and both sides entered the bulk of their forces centrally and during Turns One and Two made for the footbridge...virtually all the terrain was hard going slowing both sides down, the orchid and cornfield did offer light protection for troops in them...


Forward for the Union!

Come on Boy, for the Confederacy Hurrah!

A few Yankees advanced through the cornfields, it was hard going!


Turn 3 and first blood was drawn, a Rebel Skirmisher was felled by a Yankee Minie ball  as he approached the stream...this did nothing to deter the main Confederate attack though and they got to the crucial footbridge before the Bluebellies...

Rebel Skirmishers reach the footbridge...


Elsewhere a firefight across the stream began as both sides moved up and deployed...


Turn Four saw the battle start to move to the flanks where the fords were located while around the bridge the carnage began as both sides traded volleys!

The Yankees right flank crossed the stream in strength...

...whereas on the other side of the battlefield the Rebels were deploying more slowly and only managed to get skirmishers across the stream...the small bullet indicates that unit has had its actions for the current turn and the empty cartridge means their weapons are unloaded...

Both sides lining up and taking aim! On the right of the picture a unit of Rebs can be seen scooting toward the nearby ford in support of the skirmishing line that had moved ahead of it!

Turn Five and losses started to tell against the Southerners, of great importance they lost several more skirmishers and the Yankees got troops onto the footbridge!

The first Federals advance onto the bridge and push back their Confederate counterparts...

Overall situation in the centre of the action at the end of Turn Five...

Turn Six and the Yankees were concentrating effective fire on the Rebs and looked to be in a good position to turn the Southerners left flank while holding the Confederates trying to turn their own left flank. With the situation looking dire the Confederates chose to try and win in the centre and stormed the footbridge!

Union troops threaten the Confederates left...

 The reason the Yankees left flank was so successful was the poor Rebel Leadership i.e. shite dice rolling! Both the Rebel units failed to get even a single action!

The Confederate attempt to turn the Northerners line was stymied!

Meanwhile the Rebs advance in the centre the battle was still there to be won despite the poor performance on their flanks...


Overall situation at the end of Turn six Yankees to the left and Rebels to the right...


Turn Seven and both sides suffered from command issues and the battle for the bridge stalled but on the flanks the Union fire inflicted heavy casualties and three Rebel units broke fleeing to the rear suddenly there were wide gaps in the Southerners line!

With the initiative on their side the Rebs decided to charge the Yankees centre first thing Turn Seven but the dice had other ideas three action failures! But luckily for them the Union Command was just as bad and both units facing the Rebs on the bridge failed their activations as well!

The firefight across the stream continues!

But the Yankees had the better of it...the Zouaves took aim at the depleted Rebels facing them...

... and moments later the Rebel line is shattered!


Turn Eight and it was all over! With their first actions the Yankees charged the Southerners on the bridge and after two rounds of combat broke them. As the Rebel centre fled their force morale collapsed! The grey clad boys from the South hastily retired leaving the cheering Yankees in control of the vital footbridge!

The first round of combat as the Yankees charged onto the footbridge was a tie so both sides lost a figure and a second round of combat ensued...

...this round the Yankees won decisively...

...and the Rebel unit was routed! More poor rolling for them!

"Hurrah! Take that Johnny Reb!"

Overall view of the battlefield at the end of the game...


This was a solo play through of another game that we'll play as a group once we recommence TSOG catch ups! The turnovers of play order that come from 'unlucky' action rolls being random does help with solo play and several times during the game my plans were thrown into disorder thanks to this mechanic!

The scenario played well and as usual these rules gave a good game. Up until the end of turn Six either side could have won but by the end of Turn Seven it was destined to be a Union victory, the dice Gods can be cruel and today the Southerners got the short end of the stick! Of note tactically the Rebs were at a disadvantage after Turn Five when they had lost over half their skirmishers, these guys are very important and this gave the Yankees an edge! 

FYI - this scenario should be easy to adapt to other rule sets, I even adapt it to other eras!

Oh and Keep well!

Sunday 5 April 2020

The Battle of Grossbeeren - Blucher AAR

We played this game a few weeks ago, I know I've been a bit slack posting this up but better late than never. We revisited the Blucher rule set with yet another scenario from the ‘oldmeldrumwargamesgroup’ team. This time we played the Battle of Grossbeeren (must be a good scenario as it has the word beer in it!). I umpired, Dave took the Prussian side and Alan and George played the French each commanding a Corps. As neither of the Armies Commanders were present at the actual battle, Oudinot was ill and Bernadette as usual was up to something else (there is a special rule for this game of no CnC activation) I kept both sides players in the dark about their reinforcements (what was coming and when).

The scenario can be found here…

The Battle Map…

I’ve used the scenario map and added some fancy arrows/rectangles to show how the battle developed, there were three main phases; the initial French advance, secondly the French IV Corp trying to breakout of the woods near Blackenfeld while the French VII Corps secured Grossbeeren and then finally the Prussian attack to capture Gossbeeren and the heights. 

The AAR

The game started as expected with the French IV Corps pushing forward to overwhelm their counterparts of the IV Prussian Corp around Blackenfeld. The French Advance Guard took quite a beating from the Prussians but they did their job covering the rest of the Corps as it deployed. The French were then content to stretch their line out to match the Prussians and make a shooting contest of it. It was sensible as with the skirmish trait available on every unit they had it gave them a distinct advantage.

The French IV Corps advanced from the woods...

...and deploys in line to engage the Austrians


While the action before Blackenfeld unfolded the French VII Corps arrived and were quick to occupy Grossbeeren and the adjacent high ground (the scenario objectives for both sides).

With the use of Reserve Movement the French quickly took Grossbeeren and the high ground, they retain their concealment as they are over 8 BW's from any enemy in their LOS (our house interpretation of sighting rules)...

The Prussians IV Corp despite losses (including voluntarily retiring two units) kept the French bottled up as they tried to deploy from the woods.

Prussians keep the French pinned against the woods and block their route to Grossbeeren...

The delaying of the French IV Corps was very helpful for the Prussians as when Von Bulow (Vigorous trait) arrived on the table with the balance of the IV Corps and the III Corps the French defenders in and around Grossbeeren were isolated and outnumbered!

The French right now pulled out all stops and several charges were carried out and these unhinged the Prussian defenders around Blackenfeld and opened a way for them to reinforce their comrades at Gossbeeren but it was too late they had been delayed long enough so that they were effectively out of that part of the battle!

The Prussian left wing dispersed by the French while the infantry fled the sole cavalry Brigade moved toward the right Flank to add more pressure to the French at Grossbeeren...

Over to Von Bulow and his attack on the French at Grossbeeren. The Prussians formed a large line and advanced en mass, Von Bulow’s trait allowing activations at half the number of MO’s required made this movement easy even with only two MO dice available! The French kept their powder dry and awaited the onslaught. Finally with the Prussians close enough to fire on bad luck struck the French! First it started to rain so volley fire was negated to skirmish fire (scenario special rule), secondly the French got only two MO's so were unable to redeploy as required and lastly the Prussian scored two shooting hits on the French artillery unit in the centre of their line and on the high ground causing it to retire!

The first wave of Von Bulows right wing line up to attack the French...

As the first seven Brigades of Prussians move forward nine more Brigades arrive! Hopefully the French Commander is wearing his brown trousers!

With the help of rain and some luck the Prussians push the French line back! The second wave used their Reserve Move to get right up behind the first it was now sixteen Brigades to seven...

The MO Dice can be cruel! The Dice Shako is removed to show snake eyes after the French have only moved a couple of units on the IV Corps...Merde!

After the initial contact between Von Bulow and the French VII Corps the last few turns turned into a desperate fighting withdrawal for the French. Then drew back while trying to inflict casualties and hold Gossbeeren, they put up a valiant effort but the Prussian numbers prevailed and they were pushed back.

 The French struggle to hold their ground...

...and Grossbeeren...

Overall a Prussian victory, if we play this again the French really need to push on their left so they can get more troops around the victory objectives, Grossbeeren and the heights beside it.

Overall a good nights gaming was had and we had a result close to the historical outcome, our French IV Corp was more successful than the original though. Consensus is we’ll definitely get Blucher rules out again plus I am all set for a Waterloo refight at brigade scale (40mm x 20mm units) later this year (one hopes in June but with this Covid19 stuff who knows!)…