Admiral Patey
Fleet commander ANMEF
Colonel Holmes
Force commander ANMEF
Rabaul 11th September 1915
From : Commander Beresford
Kabakaul landing
Following on from my earlier report I am now forwarding a further update covering the final push late this afternoon onto the transmitter station at Bita Paka.
As previously advised I ordered Lieutenant bond and Captain Travers from the army intelligence unit with a half company of ratings and the machine gun section to the Bita Paka clearing with the objective of taking the transmitter. They were accompanied by the German Lieutenant Kempf who had undertaken to try to convince his compatriots remaining in the clearing to surrender. I remained with the bulk of the shore units at the cross road in case reinforcements were required.
 |
| Lt Bond enters the clearing with Kempf |
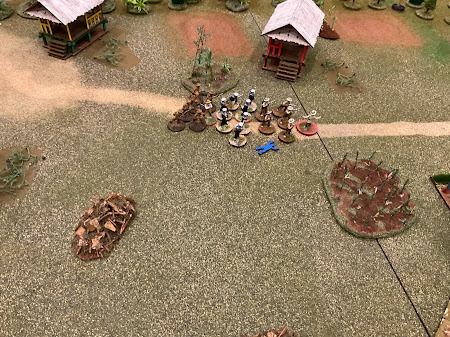
Bond and Travers along with petty officers Sandys and Palmer and an 18 man squad of ratings plus the machine guns advanced into the clearing only to have Kempf escape from their custody. Travers reported that upon entering the clearing they encountered a small party of Germans and native police. Kempf ran to this party and they immediately dispersed into the huts and surrounding undergrowth. Then bond, totally ignoring those parts of my orders that required him to secure the huts and arrest the Germans, and indeed apparently ignoring the enemy directly in his vicinity, led his entire command down the track at a fast run in the direction of the transmitter. Travers reports that he threw out no flank guards and secured none of the huts as he progressed.
 |
| Lt Bond charges off like someone in search of a DSM |
Travers also reported sniper fire from the surrounding jungle which wounded several men around the police hut. As bond advanced down the track he lost several more men to intense sniper fire from the surrounding fields. He did not do anything about the snipers and appeared intent on capturing the transmitter station in a coup de main. Travers last saw bond as he assaulted the transmitter station several hundred metres away. It was also noted that one small group apparently led by petty officer palmer had detached from bonds team under heavy fire and moved into one of the surrounding huts. Fire from the surrounding huts had intensified as travers began to set up his machine gun in the small clearing.
 |
| Casualties start to mount from snipers |
At this time I led the first group of reinforcements into the clearing. It was immediately obvious that bond had failed to secure his lines of communication and that our advance into the clearing was seriously in jeopardy. Captain travers came under intense fire from a large unit of Germans in the hut to the left side. His entire machine gun team became casualties in the first few minutes. Luckily he survived. However it was clear that we could not rely upon the extra firepower from the machine gun. Lieutenant Gilliam brought his company with me and that of midshipman Buller. Gilliams unit also came under intense fire. However when joined by bullers unit we were able to both fall back to the police hut and eventually silence the Germans on the other side of the small clearing.
 |
| Commander Beresford shows the Germans some cold |
Neither travers nor myself were present at nor party to, the rest of the action as it unfolded near the transmitter. I am reliant upon statements provided by several wounded ratings who made their way back to the crossroads later this evening. Once it was obvious that bonds attack on the transmitter had failed I decided to retire the remainder of the force back to the crossroads and start afresh tomorrow morning.
 |
| Germans and bodies everywhere so Beresford retires to write a report blaming everything on Bond |
Statement from able seaman Ferrier 6th company
I was with Lieutenant bonds company as we entered the clearing. As we did so the German who we had as a prisoner shouted something then ran forward. Then the Germans who had been standing there ran off into the nearby huts and fields. Lieutenant bond ordered us down the path to the transmitter. petty officer Sandys asked whether we should throw out flank guards or secure the huts as there were obviously Germans about. Bond said that the transmitter was the important objective and that we needed to move quickly. He said that Commander Beresford would deal with any Germans we bypassed.
Sniper fire was getting hotter and seaman Brennan went down. We moved at a run down the track. With no cover we took more casualties from the snipers. Eventually petty officer palmer took the remains of his squad at a run to a hut to the left of the track. We had reached a point about a hundred yards from the station when all hell broke loose. We could see German troops in each of the huts including those behind us. They just seemed to rise up out of the ground like ghosts. We were surrounded. The fire intensified and more men were hit.

*ed. It should be noted that lt bond was actually in a position to win the game outright. The Germans got to throw SHiT dice at the end of each PHART phase. The chances of full scale German retaliation increased as the Australians secured huts, arrested Germans, and got closer to the station. Bond secured no huts and arrested no one ; so the Germans merely added some more snipers and had a go at blowing up the transmitter. By coming within a move of the station however the Germans got to throw on the table with a 75% chance of KRAP happening (Kempf rallying the troops and commencing the resistance). The German failed the roll and added another GRIT token for reinforcements. Pete playing the German only had 2 GRIT points but succeeded in his roll …..the PHART phase ended, the Germans were placed in their set up positions and the reinforcements entered. Bond was within 1 run move of outright victory.
Lieutenant bond waved his pistol, ordered us to fix bayonets and we charged over the sandbags in front of the station and got inside.

We found two civilian engineers who were dismantling the workings. We pointed our rifles at them and put them in a corner under guard.

Outside we could hear more German yelling and the gunfire stepped up. P.O. Sandys ordered us to fire at a large party of Germans that had emerged down the Toma road. We missed and they charged round the front of the station and tried to get in through the doors and windows.

We held them off and knocked a few down. However there were too many of them and they eventually forced their way in. I was hit in the shoulder and collapsed under one of the tables.
 |
I saw P.O. Sandys and Lieutenant bond both firing their pistols in the main hall before going down under a hail of blows. It was clear that all the men from the two squads with Lieutenant bond were either dead or seriously wounded. I had no idea what had happened to P.O. palmers team but I suspected the worst.

The Germans got the doctors and medicos to us pretty quick. However it was dark and I had rolled further beneath the transmitting table and hid till nightfall. I dragged myself out and back down the trail. I met up with seaman Lucas from P.O. palmers team who had also sustained quite a serious wound. I asked about palmers and he said they were all dead. It was clear that the entire command had either been killed or taken prisoner. We moved down the track and eventually found Commander Beresford.
It is clear that by ignoring my orders Lieutenant bond placed his entire command and the success of this operation in peril. My estimate is that as many ten ratings have been killed and possibly a further twenty seriously wounded. If bond were not dead I would recommend he be court marshalled. If by some chance he has survived I would recommend that he be patched up and then court marshalled. It worked for Ned kelly.
Commander Beresford RAN
 |
| The lower half of Maurice aka commander Beresford thinking of various forms of character assassination |