Monday 27 December 2021

 Oh Camel ye faithful

Adventures with the Western Desert Force in WW1

The affair of the Wadi Senab : 11th December 1915


By way of a rules test we decided to take ‘From shako to coal scuttle’ by Nordic weasel games for a spin in the ww1 western desert. You can find some background briefing on the little known ww1 western desert campaign and this scenario here The Senussi campaign


The Senussi were a religious grouping of Bedouin and Arabic desert dwellers who had fought the French, the Italians, the ottomans, and each other for several years in the Libyan and North African coastal regions. Stirred up by the Turks (who also rather nicely provided arms and equipment and some serious training) they were incited into action during 1915. Replete with many tales of daring - do the campaign was conducted by a cobbled together imperial force including Indians, Australians, New Zealanders, South Africans, territorial yeomenry and literally anyone else not doing anything. It was to demonstrate both the best and worst of British leadership and military prowess. 


Unfortunately, despite its rich pickings for war gamers it has been somewhat neglected ; fear not! TSOG has ridden to the rescue. Once you’ve had a bit of a read of the background brief read on…


Early in the campaign the British established a forward base at matruh and commenced combined operations. One of the first encounters was at the wadi senab on 11 December 1915.


General Wallace split his forces; sending the mounted column and guns inland whilst the foot advanced along the coastal road.


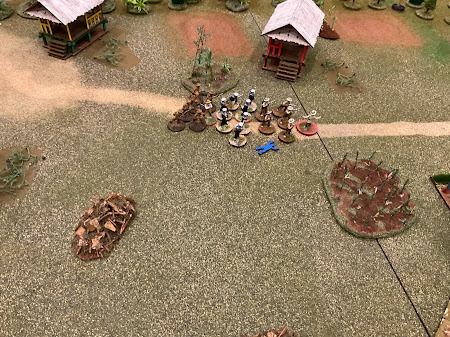
The Imperial units set up at the positions on the map. As luck would have it the first Sanusi units to activate were the Ghar’barge ones on the left hand side (Senussi units come in three sorts ; highly trained mutafizia, tribal Ghar’lib, and Ghar’barge from the desert). This caused the imperial units to immediately veer to the left. As later developments will show, this provided an unintended advantage for the imperials in that it kept them from being mown down by the unseen Ghar’lib in the wadi. 


The first turn was spent with the Senussi firing wildly at the armoured car and leading yeomen. Those Senussi who didn’t engage in such timid behaviour leap up and started running towards the Imperial line shouting loudly as they went. Major Wigan remained unaware of the much better quality Senussi on the right (‘they’re only blinds and could be anything’ quoth Major Wigan). Deciding to ignore the potential threat, the yeomen turned almost as one and moved toward the left hand enemy units. 


Several turns elapsed where close range charging from the yeomen was responded to with close range counter charging and firing from the Senussi. It should be noted that these units were only partially armed with rifles and equally likely to obey or disobey orders; failure to obey resulted in them screaming off toward the nearest enemy in a fanatical attempt to close and kill. Several rounds of combat occurred along the battle line with honours being shared fairly equally. 


The Senussi unit to the left are about to cement themselves in Bedouin folk lore by fending off a charge from both the yeomen units and living to tell the tale.


The armoured car attempted to reverse out from between the sandy boggy area and immediately damaged a rear axle. It kept moving and firing but the mechanic was not amused as he was going to have to get out and fix it. ‘It’s got a reverse gear, we can use that’ he exclaimed haughtily. 


One sand dune was set to become a constantly fought over terrain feature before eventually falling to the Senussi.


The Imperial commander was having trouble trying to work out what to do with his guns. They moved too slowly to be able to race down the length of the board and escape, so inevitably had to unlimber and attempt to fight off the Senussi on their own. It was clear that the poor quality Ghar’barge had dragged the yeomen off the road and absorbed much of the damage. This action therefore removed the yeomen from the potentially devastating field of fire of the better quality tribal Senussi yet to emerge from the wadi.


The group at the bottom spent their time rather ineffectually firing at the armoured car while alternatively advancing then being driven back by the hail of machine gun fire. It was fun but was it war?


It was clear that the right hand side of the board was probably more dangerous for the imperials than the left-hand side. As the better quality tribal units emerged from the wadi and closed with the artillery, there was a growing sense of doom in the imperial camp. At this stage the Senussi brought their machine gun to bear. The threat from the armoured car however was so great they decided to use it in an attempt to penetrate the armour and knock out the vehicle. It didn’t happen but it was noisy.


In the ongoing fight over the sand dune one unit was routed off the playing area and disappeared back into the desert. This did not help save the yeomen as they were quickly replaced with another Arab unit that cleared the sand dune once more.


At this stage the yeomen were starting to feel the effects of a long and bitter encounter. One unit was withdrawing to the rear of the column despite not suffering many casualties. The lead yeomen were reduced to 50% and took shelter behind the armoured car along with major Wigan. Due to a lack of targets the tribal Senussi and machine gun found themselves in the open and equidistant between the armoured car and the field guns. They were driven one way and then the other under the hail of shells and bullets. Unfortunately for the British the shelling caused not much more than a few scratches. 


The advanced English group were now completely separated from the rear of the column. The artillery were desperately trying to work out how they could stop the oncoming Senussi with just a couple of yeomen, a squadron of Australian Light-horse, and an apparent absence of shells that killed Senussi. More importantly, the Notts battery had never loosed a shot in anger previously; so even firing the guns was a bit problematic (‘the big cylindrical looking thing goes in the bottom end lads’).


The sand dune was finally claimed by the Senussi with the yeomen retreating back to support the guns. Both yeomen units had been very roughly handled.


At this stage Wigan decided that as discretion was the better part of valour, cowardness was the better part of discretion, and decided to lead the armoured car and the remnants of the yeomen off to link up with the main force.


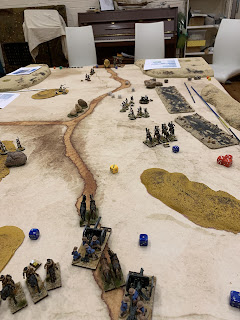
To the right in the pic below the battered but still mobile Ghar’barge units can be seen still surging after the retreating English.


This unfortunately left the balance of the column to defend themselves against the bulk of the Senussi until help arrived. To the sound of mutterings such as ‘the bastard, where is he going?’ and ‘calls himself a commander … I’ve had better commands from madam Lazonka at the pussy cat palace in soho’ major Wigan absented himself from the affair (yes, we realise that this pic makes it look as if Wigan was leading his men into a bowl of  cheezels…but we can assure you they were all eaten by the Senussi before he got there).


The Senussi commander at this stage decided to bite the bullet (or the cheezels), identify what he could for intelligence purposes, and bugger off to rejoin the main army. This decision and the fact that we had reached the end of the 12 allotted moves saved us working out how the hell the artillery was going to survive until the main column bailed them out.

The guns can be seen circling the wagons (well, the draft horses anyway) with the yeomen retiring back to provide support (alright …fleeing in panic back to provide support). The aussies have gone forward to buy time. Note in doing so they sustained 2 casualties and 4 points of disarray.  So the next turn would have seen them flee back to the guns to rally. The situation could be best described as a bloody fiasco, or officially, a good test of the initial British deployment programme subject to future operational modifications.


A good run through of shako to coal scuttle. We got through 12 action packed and dramatic moves with a definite result. 
 One realisation is that it’s a dice rich set of rules. If you like rolling dice these are for you : we rolled thousands of them. 


The next test is to try a bigger battle. So on to day 2 of the Senussi campaign…another wadi and another ambush (the British just don’t seem to learn, do they). This time they are strung out along a coastal road and have to fight with their backs to the Mediterranean. 


In this forthcoming affair the British will learn that

1. Fighting with your back to the Mediterranean is better than the other way around,

2. The shrapnel shells are in the boxes labelled shrapnel,

3. Australians have big horses and you can hide behind them,

4. Never divide your forces in the face of a bigger and unknown enemy,

5. Sending the entire battalion is better than just sending the lead company even if you do think that one British tommy is worth 1000 hostile savages,

and

6. Never believe what you read in wargames blogs. 


Wednesday 3 November 2021

Bita Paka Part 3 the AAR - The unfortunate rigidification of Lieutenant Bond


Admiral Patey

Fleet commander ANMEF

Colonel Holmes

Force commander ANMEF

Rabaul 11th September 1915


From : Commander Beresford

Kabakaul landing 


Following on from my earlier report I am now forwarding a further update covering the final push late this afternoon onto the transmitter station at Bita Paka.


As previously advised I ordered Lieutenant  bond and Captain Travers from the army intelligence unit with a half company of ratings and the machine gun section to the Bita Paka clearing with the objective of taking the transmitter. They were accompanied by the German Lieutenant Kempf who had undertaken to try to convince his compatriots remaining in the clearing to surrender. I remained with the bulk of the shore units at the cross road in case reinforcements were required.


Lt Bond enters the clearing with Kempf


Bond and  Travers along with petty officers Sandys and Palmer and an 18 man squad of ratings plus the machine guns advanced into the clearing only to have Kempf escape from their custody. Travers reported that upon entering the clearing they encountered a small party of Germans and native police. Kempf ran to this party and they immediately dispersed into the huts and surrounding undergrowth. Then bond, totally ignoring those parts of my orders that required him to secure the huts and arrest the Germans, and indeed apparently ignoring the enemy directly in his vicinity, led his entire command down the track at a fast run in the direction of the transmitter. Travers reports that he threw out no flank guards and secured none of the huts as he progressed.


Lt Bond charges off like someone in search of a DSM

Travers also reported sniper fire from the surrounding jungle which wounded several men around the police hut. As bond advanced down the track he lost several more men to intense sniper fire from the surrounding fields. He did not do anything about the snipers and appeared intent on capturing the transmitter station in a coup de main. Travers last saw bond as he assaulted the transmitter station several hundred metres away. It was also noted that one small group apparently led by petty officer palmer had detached from bonds team under heavy fire and moved into one of the surrounding huts. Fire from the surrounding huts had intensified as travers began to set up his machine gun in the small clearing. 


Casualties start to mount from snipers


At this time I led the  first group of reinforcements into the clearing. It was immediately obvious that bond had failed to secure his lines of communication and that our advance into the clearing was seriously in jeopardy. Captain travers came under intense fire from a large unit of Germans in the hut to the left side. His entire machine gun team became casualties in the first few minutes. Luckily he survived. However it was clear that we could not rely upon the extra firepower from the machine gun.  Lieutenant Gilliam brought his company with me and that of midshipman Buller. Gilliams unit also came under intense fire. However when joined by bullers unit we were able to both fall back to the police hut and eventually silence the  Germans on the other side of the small clearing.


Commander Beresford shows the Germans some cold sausage steel


Neither travers nor myself were  present at  nor party to, the rest of the action as it unfolded near the transmitter. I am reliant upon statements provided by several wounded ratings who made their way back to the crossroads later this evening. Once it was obvious that bonds attack on the transmitter had failed I decided to retire the remainder of the force back to the crossroads and start afresh tomorrow morning.


Germans and bodies everywhere so Beresford retires to write a report blaming everything on Bond


Statement from able seaman Ferrier 6th company


I was with Lieutenant bonds company as we entered the clearing. As we did so the German who we had as a prisoner shouted something then ran forward Then the Germans who had been standing there ran off into the nearby huts and fields. Lieutenant bond ordered us down the path to the transmitter. petty officer Sandys asked whether we should throw out flank guards or secure the huts as there were obviously Germans about.  Bond said that the transmitter was the important objective and that we needed to move quickly. He said that Commander Beresford would deal with any Germans we bypassed. 


Sniper fire was getting hotter and seaman Brennan went down.  We moved at a run down the track. With no cover we took more casualties from the snipers.  Eventually petty officer palmer took the remains of his squad at a run to a hut to the left of the track. We had reached a point about a hundred yards from the station when all hell broke loose. We could see German troops in each of the huts including those behind us.  They just seemed to rise up out of the ground like ghosts.  We were surrounded. The fire intensified and more men were hit. 


*ed. It should be noted that lt bond was actually in a position to win the game outright. The Germans got to throw SHiT dice at the end of each PHART phase. The chances of full scale German retaliation increased as the Australians secured huts, arrested Germans, and got closer to the station. Bond secured no huts and arrested no one ; so the Germans merely added some more snipers and had a go at blowing up the transmitter. By coming within a move of the station however the Germans got to throw on the table with a 75% chance of KRAP happening (Kempf rallying the troops and commencing the resistance). The German failed the roll and added another GRIT token for reinforcements. Pete playing the German only had 2 GRIT points but succeeded in his roll …..the PHART phase ended, the Germans were placed in their set up positions and the reinforcements entered. Bond was within 1 run move of outright victory.


Lieutenant bond waved his pistol, ordered us to fix bayonets and we charged over the sandbags in front of the station and got inside.


We found two civilian engineers who were  dismantling the workings. We pointed our rifles at them and put them in a corner under guard.  


Outside we could hear more German yelling and the gunfire stepped up. P.O. Sandys ordered us to fire at a large party of Germans that had emerged down the Toma road. We missed and they charged round the front of the station and tried to get in through the doors and windows. 


We held them off and knocked a few down. However there were too many of them and they eventually forced their way in. I was hit in the shoulder and collapsed under one of the tables.  


I saw P.O. Sandys and Lieutenant bond both firing their pistols in the main hall before going down under a hail of blows. It was clear that all the men from the two squads with Lieutenant bond were either dead or seriously wounded. I had no idea what had happened to P.O. palmers team but I suspected the worst. 


The Germans got the doctors and medicos to us pretty quick. However it was dark and  I had rolled further beneath the transmitting table and hid till nightfall. I dragged myself out and back down the trail. I met up with seaman Lucas from P.O. palmers team who had also sustained quite a serious wound. I asked about palmers and  he said they were all dead.  It was clear that the entire command had either been killed or taken prisoner. We moved down the track and eventually found Commander Beresford. 


It is clear that by ignoring my orders Lieutenant bond placed his entire command and the success of this operation in peril. My estimate is that as many ten ratings have been killed and possibly a further twenty seriously wounded. If bond were not dead I would recommend he be court marshalled. If by some chance he has survived I would recommend that he be patched up and then court marshalled. It worked for Ned kelly.


Commander Beresford RAN


The lower half of Maurice aka commander Beresford thinking of various forms of character assassination 


Bita Paka Part 2 - Scenario, PHART ing around in Rabaul

To give what could have been a simple encounter in the jungle some life and zip we dreamed up some complications. The real issue is the tension between the Australians waltzing in and seizing the transmitter and the Germans reacting.

So we came up with PHART and it’s associated ‘out lardying the lardies’ deeply regretted puns*. 

Note: because we are absolute bastards no one gets to fire at each other until the PHART phase ends  

*ed. We don’t regret them for an instant, really.

Pre-game Historical Australian Redeployment Turn

Pre-game the Germans will


Throw for BUTT total (10d10 to determine damage level for transmitter).


Throw for initial snipers (1d4)

Snipers fire from one of the 6 flag markers to be randomly determined each PHART phase


Randomly allocate the German units to the various locations but don’t put them on the board

(barracks, 4 huts plus the station, trench and banana grove. Max 1 unit per hut)


The Australians then proceed to move their units; capturing Germans, securing the huts etc.


Following the Australian PHART phase the Germans react by throwing a SHiT dice (1d8).


The Germans will be affected by the encroachment of the Australians. Depending on how they are viewing the ‘sweet and meet to die for ones country’ line, their reactions may be positive or negative.

This is simulated by adding one dice with ‘+ or - or 0’ to the SHiT roll, for each of the three possible variable conditions met in each turn. If the condition isn’t met the Germans don’t get that variable dice. The SHiT roll is amended by the nett result accordingly. 

The three conditions are :
  1. German prisoners have been taken
  2. The Australians have taken sniper casualties 
  3. Kempf is still at large

Schutztruppe Historical Initiative Table 

D8

No huts secured 

Barracks  only 

Hut 1

Hut 2

Hut 3 

Hut 4

Station (or within 9)

1

GITS

GITS

GITS

GITS

DICS

GRIT

GRIT

2

GITS

GITS

GITS

DICS

GRIT

GRIT

GRIT

3

GITS

GITS

DICS

GRIT

GRIT

GRIT

KRAP

4

GITS

DICS

GRIT

GRIT

GRIT

KRAP

KRAP

5

DICS

GRIT

GRIT

GRIT

KRAP

KRAP

KRAP

6

GRIT

GRIT

GRIT

KRAP

KRAP

KRAP

KRAP

7

GRIT

BUTT

BUTT

BUTT

BUTT

BUTT

KRAP

8

BUTT

BUTT

BUTT

BUTT

BUTT

BUTT

KRAP


The possible SHit outcomes are:


GITS:

Germans in trees shoot 

Add 1d4 snipers to pool


Sniper total is then allocated to a random location in the jungle and those snipers who have a line of sight to a target may shoot


GRIT:

German reinforcements introduction token

Add 1 to GRIT total 


At the end of each PHART move the German player throws a d6 to see if reinforcements enter. They must throw equal to or less than the current GRIT total for the reinforcements to enter.


BUTT:

Blow up the transmitter token 

Add 1 to BUTT total


At the end of each move  (including PHART ) the German player throws a d6 to see if damage is caused to the transmitter. Equal to or less than the current total = 1d20 damage


DICS:

Deploy incredibly cautious Schutztruppe 

1 random German unit is placed on the board (either in its designated location, or, if that location is occupied by Australian forces, within 1 manoeuvre move of the location)


KRAP:

Kempf rouses all patriots

PHART phase ends and game begins 

Units in ARSE mode will immediately fight a melee


ARSE (ARREST LOCK)

Units coming within 3 of each other will immediately enter the ARSE phase (Arrest, Restrain and Secure). The Australians will attempt to arrest the Germans turn until either the whole unit has  been arrested or the PHART phase ends. If they are still unrestrained when KRAP happens or the Germans start firing, they will immediately fight a round of combat


The pregame ends when either the German player makes a successful GRIT roll , the Transmitter is destroyed, the Australians occupy the station at the end of the Germans reaction turn, or KRAP happens.


Note that if the Australians occupy the station and it’s relatively intact at the end of any German turn, they automatically win. 


So now you have all the information you need to enjoy Part Three :  the unfortunate rigidification of Lieutenant Bond.

(Spoiler alert anyone ?)