Wednesday 29 September 2021

ECW AAR - Baroque Rules

Monday night we tried out and ECW game using Baroque Rules!

Both sides had 600 point armies created using the 'Army Lists' in the Rules.

Each side deployed hidden from the other and it turned out that both had roughly equal centres and beefed up right wings.

The game was aggressive (as we wanted to test the rules to the limit). Initially the Royalist Right ploughed through the Parliamentary flank and threatened to roll up their entire army whilst a similar result was occurring on the other side of the table as the Roundheads Right broke the Royalist Left! A bloody and close engagement ensued that saw the Royalists just win!

Some pictures of the action!

The Parliamentary Infantry form up in the centre of their battle line...

The Royalist Army (to the left of picture) boldly advance as the Parliamentary Leader calmly sipped on a frothy beverage!

Brave Cavaliers crashed into a Roundhead Cavalry Unit soundly defeating going on to overrun the artillery nearby and then rode wildly off and played little further part in the game!

We discovered Cavalry should not enter woods, well actually we knew that beforehand but retreating and pursuing Mounted Units sometimes have a mind of their own!

Parliamentary Infantry advance on their opponents!

The Royalist Horse begin to roll up the Parliamentary line, here a Roundhead Pike & Shotte Unit is hit in the flank by a Mounted Unit while Royalist Infantry advance to their front!

Confusion reigned as the battle reached its climax with both sides Infantry fearing Mounted Units outflanking them!

So an entertaining game was had, we have a couple of rules questions to resolve but will definitely have another go with them. There was quite a lot more movement than we expected especially amongst the mounted units, while the infantry slugged it out! The good thing is mastering these rules will allow us to play Ancients Games as Maurice has an extensive collection of those and these rules are basically the same as Impetus that covers that era!

Monday 20 September 2021

Kurtsevo - July 29, 1941


TSOG Visits Smolensk

July 29, 1941. With Smolensk surrounded, elements of the 7th Panzer division are pressing on towards the ultimate prize, Moscow. Soviet forces have regrouped however and are intent on cutting the German supply lines around the town of Kurtsevo. Tasked with defending the supply depot, the 1st Mechanised Infantry regiment set up a roadblock and a makeshift bunker, deploying on the edge of the town. They were provided with a PaK36(t) anti-tank gun.

 The Russians managed to find some armoured support in the form of a BA-10 armoured car and an aging BT7 light tank and pressed the attack across the sunflower fields on the outskirts of the town.

The German patrols were either timid or arrogant (or perhaps had a cunning plan), but either way, they let the Soviets cross the open fields unchallenged right up to the edge of the village. Quickly occupying the outlying buildings and the gully of a riverlet, two sections of Soviets waited patiently until the Germans exposed their position.


Russians in the village! 

Alerted to their presence, German LMG teams hurried into position in the bunker and also occupied the river gully further upstream and around a bend. The Russians opened fire as they saw their hated enemy appear, much to the shock of the German troops.

The MG34 is a fearsome weapon though and it cut through the Russian troops in the gully like a scythe.


 Take that Ivan!

More teams arrived on the battlefield from both sides and fire was exchanged without any noticeable gains in ground. But after suffering a few casualties, the panzergrenadiers in the gully withdrew back to the cover of the village enabling a Russian section to advance to the wood’s edge unopposed.

The distinctive rumble of engines grew louder and a BT-7 light tank appeared from around a bend in the road, spraying the German bunker with its machine gun. Combined fire from the tank and the rifle squads ripped through the MG team in the bunker and the last remaining gunner withdrew to make room for another team.

The AT gun, positioned behind the roadblock, let fly a round at the approaching tank. A hit on the front armour shook the crew inside but merely scratched the paintwork. It did cause the tank commander to halt and reconsider his decision to close though.

 Things are looking bleak for the Germans

A BA-10 armoured car also entered the fray and joined its fire with that of the tank, which had moved off into the sunflower fields to make some room. Unwilling to risk the devastating fire of the MG34 teams, the Russians stayed where they were concentrating all of their efforts on taking out the AT gun crew. The gun was unable to penetrate the frontal armour of either vehicle, but it did damage the gun sight of the tank limiting the main weapon’s usefulness.

 "Shoot them" said Maurice.

More lethal fire rained down on the Russians in the gully forcing the survivors to withdraw from the battle. But some enfilade fire and accurate mortar rounds on the AT gun killed the crew and left the Germans unable to defend against the Russian armour. A tactical withdrawal off board was decided and the Germans ceded the battle.

A significant victory for the Russians!

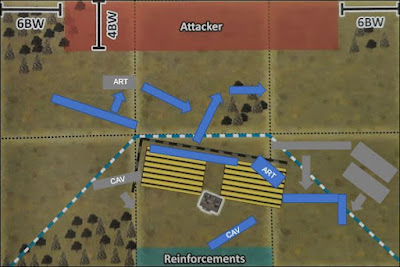
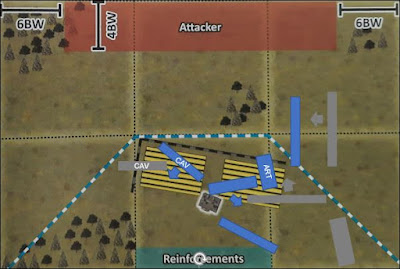
The game was played using Chain of Command, setting up according to Table 1 in the excellent Pint Sized Campaign of Smolensk (by Stephen Philp - link). We weren’t using the campaign rules (not yet anyway) as this was just a training game for the guys and a chance for me to try my hand at refereeing. Plus it gave Pete a chance to finally roll some dice! We used scenario 3 Attack and Defend from the main rulebook.


Table Layout (lifted from the campaign book)

Pete and George played the Russians and Dave and Maurice played the Germans while I pretended to know the rules, while drinking beer and eating party pies.

The game was fun and we pretty much followed the rules accurately (thanks more to Pete than me), with only one or two mistakes. Playing a campaign though will take a well-rounded understanding from everyone playing and so we’ll try a few more stand-alone scenarios before we commit to the long game. Pete and I will need to seriously expand our respective forces’ support options too before we really get going. I have a shopping list of light tanks, mortars and AT guns, as well as additional troops to reflect the scarcity of SMGs in early war Soviet infantry platoons.

Now I'm off to the shed to paint more Russkies!

Sunday 19 September 2021

Blucher Waterloo 2021 AAR - TSOG Does Napoleon’s Last Battle Again!

A delayed AAR this time for a game played in June!

Here we go again! TSOG again recreated the Battle of Waterloo using Blucher rules on June 19, the closest weekend day we could get to the actual battle date of the 18th! We used the same scenario as last year including historical army deployment and reserve arrival. Tactically players were free to act as they wanted EXCEPT there would be no Reserve Movement prior to the Noon turn due to the muddy ground and the French could not move east of Frischermont unless they captured Hougoumont, La Haye Saint & La Haye or moved their entire Army east of the Brussels Road, this was to stop them using the loop hole in Bluchers Reserve Movement Rule and delaying the whole Prussian Army getting into action with just two or three Brigades!

The Armies Deploy!


Before the action begins Napoleon's view of the Allied Army...

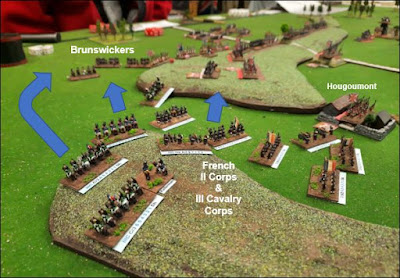
... meanwhile Wellington can see some French Batteries and the II Corps deploying toward Hougoumont!

The Plans!

The French plan was to run the II Infantry Corps and III Cavalry Corps around and deep behind the Allied Army’s right flank, if this turned out to be successful the thrust would be reinforced, if not the main axis of attack would swing to the Allied left. Hmmm same as last year!

The Allied Army's plan was to hold the Mont Saint Jean Ridge to the last man! Interestingly again the same as last year!

The Prussian plan of attack was to be aggressive and capture Planceoit with the II & IV Corps while assisting in the Allied Army with the I Corps. Ah much more considered than last years plan!

The AAR!

The opening moves saw the French following their plan to the letter. The II Infantry Corps and III Cavalry Corps advanced past Hougomont leaving a Brigade to mask it and then around the Allied Army’s right flank. The British hampered by very low command control (eg low MO rolls!) sent the Brunswickers from the reserves to face this threat while launching an attack! Yes Vandeleur's Cavalry impetuously advanced on the French right!

The opening moves unfold...

With Napoleon acting vigorously (read that as high MO rolls!) the French continued their move around the Allied Army's right flank while sending the IV Cavalry Corps forward to meet impudent Allied Cavalry attack developing near Papalotte. The cavalry clash on there proved to be brief and vicious the Heavy French Horseman drove Vandeleur's Light Cavalry back with considerable losses!

Milhaud's IV Cavalry Corps advances to meet the Allied Horse...

...and with weight of numbers and horse the French drove the Allies back!

Overall view of the the Battlefield as the opening moves play out.
Note the Brunswickers are already withdrawing before the French flank attack while Vandeleur retires.

Reille and Kellermann pushed their men hard driving the outnumbered Brunswickers back and exposing the flank of the Allied main line! 

The Allied right flank was bent back by the French onrush but it did not break! Allied casualties were heavy though and Hougoumont was isolated! Wellington was having a bad day and was slow to react as the battle was hotting up.
A note here due to the special rules Wellington rolled his own MO dice (Intuitive Trait, the French were allowed to reroll one die of their choice) and was therefore able to view the total so could plan his MO use better...his problem was getting so few! On the other hand over those same few turns the French MO total was over twenty EVERY turn!

Kellermann's Cavalry avoid the Brunswicker's prepared positions leaving artillery to deal with them! 

The overall view at this same time shows the difficulty the Allies were finding themselves in at this point!

Napoleon now assembled a Grand Battery before the Allied Army with the I and Guard Corps Artillery, not only was his left hook looking promising but Milhaud's IV Cavalry Corps had swept through Papelotte and was now threatening the left flank of the Allies' defence position! Wellington activated part of his Cavalry Reserve to bolster his right while rallying  couple of retiring Brigades recovering some of their losses!

"Curses where are the Prussians!" a quote from the Allied Commander as he juggle his limited options, here some of the Allied Reserve Cavalry can be seen moving to block the French III Cavalry Corps.

On the Allied left an interesting situation was developing, the IV French Cavalry Corps had created an opportunity that turn out too good to be resisted by Napoleon...

Finally (well historically on time actually) Bulow's IV Prussian Corps arrived on the battlefield and with their Reserve Movement quickly pushed forward into the French flank. With his line of communications threatened Napoleon deployed the entire VI Corps with orders to occupy Frischermont. Due to excellent command control thanks tot the Imperial staff Officers he also pressed forward with the II Corps too and to top it all off the Grand Battery opened fire on the Allied Army on the ridge before them!

The race to Frischermont is on between the IV Prussian and VI French Corps!

Another view of the Prussian advance Planceoit can be seen in the top left of the picture.

Now Napoleon launched a major attack, while the Grand Battery bombarded the Allied Army the I Corps using Reserve Movement marched via Papalotte into a position to threaten rolling up the Allied Army which was still clinging onto the ridge behind La Haye Saint! Meanwhile on the French right flank the Prussians occupied Frischermont but the rest of their advance was hamstrung by the appearance of the Imperial Guards Heavy Cavalry, many infantry deploying into prepared positions and their weak cavalry retiring!

At this point of the battle the Allied Army was still suffering from low MO's while both the French and the Prussians seemed to have ample command opportunities both sides realising most of their MO requests! The Dice Gods were not on Wellington's side and it was telling!

The French right flank, the arrival of the French Guard cavalry stalled the Prussian advance and D'Elron's I Corps route march around the Allied Army's left can be seen...

The French Grand Battery at work firing on the Allied line, the troops in La Haye Saint were getting the worst of it!

Reille's II Corps continues to clear the ridge. Several of the French II Corps Units at this point were becoming quite brittle having been in action since the beginning of the game but with the assistance of the III Cavalry Corps they had battered the Allies before them. 

As the afternoon wore on the fighting was now general along the whole of the line! The Prussian I and II Corps had arrived and unlike the brethren of the IV Corps they pushed ahead aggressively taking on the French and diverting two of the I Corps Divisions from their main axis of advance! The attack on Wellington's left flank by the balance of the French I Corps and Milhaud's Cavalry started successfully and sucked in the last of the Allied Army's reserves. At last Wellington hit his straps and was now very active (i.e. the Allied MO dice rolls were much better!) but he now commanded a much reduced force...DOH!

The battle was in the balance! The French were in a good position but at last the Prussians were making their presence felt and time was running out as the sun began to set!

D'Erlon and Milhaud begin to roll up the Allied Army! In the background two French Divisions of the French I Corps face off against the Prussians!

With the Allied Army stretched to the limit and the Prussians still being held at bay the French deployed the Guard! This was the first time Napoleon became involved and his limited Command 'bonus' was used (he had the Immobile Leader Trait). All the infantry of the Guard were deployed for a grand assault on the Allies still defending the ridge!

The Guard deploy, as can be seen the massed French grand battery had expended virtually all its ammunition and was now dispersed but importantly they had 'blown away' the defenders of La Haye Saint and the depleted Allied Army could not reinforce the position!

The Prussians meanwhile even though engaging the rear of D'Erlon's I Corps had become cautious and their advance on Planceoit had stalled, it was now up to the French to gird up their loins and take advantage of the opportunity presented!

Even though Wellington had 'pulled his finger out' at this stage of the action and was now very active it was too late the French Guard can be seen advancing past the shattered remains of La Haye Saint and nearing the Allied lines!

The Guard took a final volley from the Allied defenders and charged home!

Another view of the French 'last throw of throw dice' supported by Reille's II Corps!
Of note you can just see the labels of a couple of the French II Corps units and they were nearing the end of their endurance like the Brigades of the Allied army/

The final moments of the action as the destruction of one of Picton's Brigades pushes the Allied Army to its breaking point and shattered Wellington's men flee northward! The Prussians quickly disengage and retire in an orderly fashion east along their lines of communication ready to fight another day!

The Summary!

Well a French victory and with a couple Player Turns up their sleeve a most unexpected outcome! Not to take anything away from this great French achievement (especially as I commanded them) but this result was influenced by the fact that for almost the entire game the Allied Army suffered from very poor MO rolling! Up until their seventh player turn (so early to mid afternoon game time) they did not get more than 10 MOs while rolling four dice meanwhile the French had a plethora of MOs and were very aggressive using them! Unlike last years game where the Allied Army had suffered just as badly that time they had successfully 'retired' many of their weak units so they never got anywhere near their Breaking Point, so this year we had a small Allied Army teetering on defeat with a couple of Player Turns to go against last time having a small Allied Army but far from breaking an important difference! That situation coupled with the Prussian failure to press their attacks handed the game to Napoleon! As usual Blucher Rules played well and allowed us to manage a big game in a reasonable time, we started at about 11:00am and were done (including a pizza and wine break) by 4:00pm! Thanks to all those involved and we'll probably try this again next year!

Sunday 5 September 2021

TSOG Longstreet Grand Campaign #2 - Game 1 AAR

Last Monday we started a Longstreet Grand Campaign! I'm figuring if we play one game every third or forth session we should be finished by the end of NEXT year! We are just playing one 'Brigade' and one set of cards per side this time and the Leaders (Players) can rotate depending on who is available on the night (therefore negating the issue we had with the last Grand Campaign when we had as very had a Brigade per Player and organising everyone on specific nights was painful). Our core Yankee Players are Al and George and the core Reb Players are Dave and Maurice, I'll Umpire but can act as a floater (that doesn't sound good!) and fill in as a Player if required on occasions!

Rebel gunners toil fining at Col Zook's advancing Zouaves during the Battle For Jedd's Farm

Onto Game 1...

Scenario; The Walled Farm
The USA Won the Scouting Roll and elected to defend, their 8 Bases Cavalry Unit was held of board as a reinforcement.
Extra CSA Terrain 1 x Hill, 1 x Rough Ground, 1 x Wood
Extra USA Terrain 2 x Crops

Attackers Dave and Maurice
Driftwood Character Trait: Fire & Brimstone Preacher

Defenders George and Pete
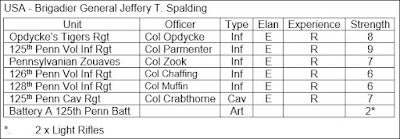
Spalding Character Trait: Friend in the State House

The AAR - The Battle For Jedd's Fam

The Reb's plan of attack was to advance with all their infantry on their left while placing their battery on their left on a hilltop supported by cavalry.
The Yankees deployed across the entire breadth of their position ready to redeploy at a moments notice.

The Armies opening deployment....

Led on by Brigadier General Driftwood the Southerners advance went to plan...for moments...much to the Rebs amazement the Yankees went over to the attack! Seeing the Rebel artillery separating from their cavalry escort Col Zook led his Zouaves forward to defeat them! Which he promptly did with little loss in a magnificent charge (earning the first Epic Point of the Campaign!). Anderson's Kentucky horse meanwhile advanced recklessly (actually trying to capture the objective location near the farmstead) and were halted by swampy ground which allowed the Union cavalry to ride forth and meet them, these two units commenced to play cat and mouse with each other for the rest of the battle!


The rest of the battle was more interesting and turned into a huge revolving door as the three regiments of Rebels advanced on the Yankee right while the two Union regiments from their centre and left swung around to engage the Rebel attack in its rear and flank!


Col Penruthen's mighty 69th Kentucky Regiment led the southern attack pinning the Union infantry while the 25th Kentucky under Col Leghorn and Clampett's Kentuckians (know also as Clampett's Foot Horse or Clampett's legion in dispatches) moved around their flank in what looked like a massacre as three regiments descended on one. Col Opdycke's facing this onslaught ordered his famous 'Tigers' to redeploy which they did in the nick of time as two of the three Southern Units attacked (Col Clampett arguing about tactics failed to advance)! In the ensuing melee the Yankees maintained their composure despite facing the infamous Rebel Yell. The Boys in Blue who took a few casualties and were pushed back held the long enough for help arrive!

Colonel Parmenter's Pennsylvanians now arrived at behind the Rebel attackers and faced off against Clampett's Legion! After some desultory fire between the sides the Yankees saw off a charge by Clampett's Kentucky lads who failed to drive home the attack acting like 'fresh fish'! The musketry duel recommenced and the action moved to the cornfields near the farm.


The Confederates 25th Kentucky Regiment covered the withdrawing Yankees of Col Opdycke while the 69th Kentucky overrun the Union artillery deployed to face them in turn to be broken by a well coordinated attack from Zook's Zouaves in the cornfields! Seeing this result the Confederate Leaders realised they had shot their bolt and retired from the battlefield!

A Yankee victory! Union Brigadier General Spalding roused his men and they pursued their enemies and the daylight faded!

Final positions...

Some pictures of the action!

The battlefield, the at the end of the first turn, the Yankees are to the right and the Rebels to the left...

Rebel Col Anderson leads his cavalry forward only to find boggy ground blocking their planned route...

Zook's Zouaves advance on Clampett's Artillery...

A magnificent site! Three Regiments of Confederates advance...

Col Opdycke's Tigers ready themselves to 'receive' the Confederates!

Overall view of the table after three turns...

The Rebels prepare to attack the Union right while Col Parmenter's Pennsylvanians can be seen deploying into column and commencing their march into the Rebel's rear!

Close up of the Rebel Grand Charge developing!

Col Clampett's infantry hold while the other Rebels screaming at the tops of their voices charge the Northerners!

The regiments of Col Parmenter and Col Clampett face off in the open fields while a melee develops in the cornfields

The destruction of the 69th Kentucky Infantry Regiment the point of the game where the Rebels lose 4 bases taking them to 17 lost in total which proved enough for the Yankees to seize victory at the end of their Player Turn...

Its been a while since we played Longstreet and during the game there was some discussion of the Action Phase and not being allowed to move and charge at the same time, we will later this year trial my alternate rules version where this is allowed but we will play this Grand Campaign with rules as written! To the game and the Union snatched a good early campaign victory in this game destroying 17 Confederate bases while only losing 6 (a die roll took the Rebs over their Breaking Point). The victory was close as the Yankees had burnt through their cards at an extreme rate and their deck was down to only ten cards so they were close losing by running out as the game ended! The Confederates meanwhile had only reshuffled once showing they were much more conservative in their card play (that was telling in my point of view). This game featured grand sweeping manoeuvres the like of which I have rarely seen in a Longstreet obviously these units Colonels had drilled their men well as they effortlessly changed from columns to lines and marched in great coordination! We're all looking forward to the next scenario (not sure Maurice is sold on the rules)!

Post Game process was completed and the below resulted.

USA Epic Points 5
CSA Epic Points 4

BG Spalding Promoted

New OOBs for Game Two