Friday, 29 October 2021

A 'Bita' action in the South Pacific Part 1 - Historical Background, Rules & Forces

Aussies first action in WW1

Bita Paka (Rabaul) Part 1 - Background

In which the gits are introduced to some obscure history and the characters for the forthcoming game 

This week takes the old gits back to September 1914 and another real life inspired minor action that, if it wasn’t for the likes of war gamers, would be relegated to the rubbish bin of history. 

One of the old gits specialises in researching weird and unusual actions and turning them into passable versions of beer and skittles war games. This is accompanied by elaborate highly detailed terrain, rule variations requiring a read through by a team of very expensive city solicitors, collections of specialised figures that leaves one wondering to which other use they could possibly be put, and enormous amounts of chips and lollies. 

Much has now been written about the opening actions in WW1 undertaken by the Australians in New Guinea. Charles Eckart wrote a quite decent summary of the opening incident in Rabaul in one of the Too Fat Lardies specials a while ago. A great deal of additional information has also been collected by the Australian War Memorial and associated history groups in recent years.


To Summarise:


The Australian government put together an expeditionary force in 1914 to take the German possessions in New Guinea and Rabaul. This force consisted of a makeshift military unit of approximately 1000 men and six naval companies totalling roughly 500 men from various Australian  craft, as well as the craft themselves. Several Capital ships and the submarine AE2 were included as there was a threat from the German Pacific fleet. The Germans did not have a standing militia in any of their pacific colonies; only a police force and German volunteers. 


On 11 September the Australians landed in Rabaul. Naval companies were dispatched inland to locate and destroy the German transmitter station at Bita Paka. What followed was a running skirmish and several encounters (that could be called battles if one squinted hard enough) lasting most of the day. The trail to the station wound narrowly through dense and in some places impenetrable jungle and the force was plagued by snipers and well sited German trenches. The action had everything a war gamer could want ; trenches, snipers, pipe bombs, urgent reinforcements including the ships cook and staff (most were issued with ‘a pistol and a cutlass’, however the cook insisted on using a very big ladle), senior officers leading  bayonet charges, people yelling at each other incomprehensibly and so forth.

Eventually, the German forces had either been dispersed, surrendered, or pushed back.  In the final action of the battle a half-company of naval ratings with the Machine Gun section, under Lieutenant Bond was sent to take possession of the wireless station at Bita Paka. Remaining resistance was very weak and a German carrying orders to dismantle the wireless was captured. At Bita Paka the equipment was found undamaged though the masts had been cut. 

The rest, as they say, is history.


The Bita Paka action could be played as a series of smaller linked actions along the path culminating in the final push to the transmitter station. In this way the Australians would have to fight through each obstacle while controlling losses. They would be mindful of  their need to get to the station before it was destroyed.


However because we are contrary buggers who are never satisfied with anything simple we thought that another way was to go to the end and see what might have happened if the Germans had managed to offer something approaching resistance at the station itself. They had the troops; what they lacked was the leadership and the morale.


When Lt Bond pushed down the track into the clearing the only German Officers remaining were either captured, killed, or ten miles away guarding the capital at Toma. Resistance at the end was tepid to put it mildly.  However the Germans still had a number of native snipers loose in the jungle as well as some 20 German volunteers and 100 native police at the Bita Paka clearing. In addition The Governor was at Toma, ten miles away with a further 10 Germans and an unknown number of native police (estimates vary but it was probably somewhere between 20 and 100 men).  


However Governor Haber did not order his reserve to Bita Paka, and no local leadership was present to continue the fight. Haber formally surrendered several days later without further resistance. 

Our “what if…” scenario therefore starts at the point where Lt Bond advances his small force down the path and into the clearing. Upon entering the clearing near the police barracks, Lt Bond does not disarm the Germans (not winning a DSO in the process). Instead Feldwebel Ritter manages to call out a warning before being gunned down. Ignoring his undertaking to end resistance and surrender Bita Paka (even if he had the authority) Leutnant Kempf knocks his two guards to the ground and dashes across the compound to rally the troops around and in the barracks.

Feldwebel Schipmann immediately informs him that a runner has been sent to Toma for the rest of the force and that an engineering team is dismantling the transmitter. There are also reserves surrounding the Transmitter Station itself but he is unsure how many. 

Their objective as it has been all day is to buy sufficient time to ensure the transmitter is destroyed or at least rendered inoperable.

The good Leutnant turns to his inadequate force of native police and volunteer Schutztruppe and exhorts them for one last effort for the Fatherland.

The game, as they say, is afoot.


The Table

Containing the Bita Paka clearing surrounded by dense jungle. The transmitter station to the left next to the Toma road. The Australians are entering to the lower right. In the clearing are a party of Germans discussing what to do about the Australians. It is at this point Kempf breaks free and the game begins. The large church could either be a portent or just hasn’t been cleared away yet. Mind you I would have thought a cathedral would have made a very good tent indeed. 

The Protagonists 

This a designed as a demonstration game with the guests playing the three Australians (or four if you put Veale into the mix).

Lt Bond RAN

Lt Kempf


Commander Beresford RAN

Lieutenant Gilliam


Captain Travers 

The Rules

Heavily modified and simplified Iron Ivan Price of Glory WW1 skirmish 


The Combatants 

Australian Naval & Military Expedition (Rabaul September 1914)

Figures

Marksmanship

Valour

Courage

Weapon

Commander Beresford

1

5

4

9

Webley

Marine guards 

2

5

SMLE Rifle

Lieutenant Bond

1

5

4

8

Webley

6th Coy 1stsection 

6

5

4

5

SMLE Rifle

(Midshipman Collins)

1

5

6

6

Webley

Lieutenant Gilliam

1

5

4

7

Webley

6th Coy 2ndsection 

6

5

4

5

SMLE Rifle

Petty Officer Palmer

1

5

4

7

Webley

3rd Coy 1stsection

6

5

4

5

SMLE Rifle

Midshipman Veale

1

5

4

6

Webley

3rd Coy 2ndsection 

6

5

4

5

SMLE Rifle

Petty Officer Sandys

1

5

4

7

Webley

4th Coy 1stsection 

6

5

4

5

SMLE Rifle

Midshipman Buller

1

5

4

6

Webley

4th Coy 2ndsection 

6

5

4

5

SMLE Rifle

Captain Travers 

1

5

4

7

Webley

Machine gun section 

3

5

4

5

Vickers HMG/SMLE


German Schutztruppe (Rabaul September 1914)

Figures

Marksmanship

Valour

Courage

Weapon

Governor Haber

1

4

4

9

Luger

Leutnant Kempf

1

5

4

8

Luger

Feldwebel Schipmann 

1

4

4

5

Luger

Truppen

2

4

4

4

Mauser

Einheimische Polizei 

6

3

3

3

Mauser

Machete

Unteroffizer Krupp

1

4

4

5

Luger

Truppen

2

4

4

4

Mauser

Einheimische Polizei 

6

3

3

3

Mauser

Machete

Feldwebel Schmitt

1

4

4

5

Luger

Truppen

2

4

4

4

Mauser

Einheimische Polizei 

6

3

3

3

Mauser

Machete

Feldwebel Daimler

1

4

4

5

Luger

Truppen

2

4

4

4

Mauser

Einheimische Polizei 

6

3

3

3

Mauser

Machete

Unteroffizer Offstag

1

4

4

5

Luger

Truppen

2

4

4

4

Mauser

Einheimische Polizei 

6

3

3

3

Mauser

Machete

Engineers

2

0

0

0

Unarmed

Snipers

1d4 +

4

na

na

Mauser

Leutnant Fiebig

1

5

4

7

Luger

Settlers and misc 

10

3

4

3

Mauser

Machete


Stay tuned for Part 2 : The PHART phase and the unfortunate rigidification of Lt Bond - an after action report by Commander Beresford to AN & ME commander Holmes.

Thursday, 14 October 2021

Midday at the Oasis! - A Men Who Would Be Kings Rules AAR

Monday night we played a Men Who Would be Kings game with the Mahdists up against the British (who else?)!

We chose Scenario B, Seek & Destroy as the basis for our game. What we did this time though to help the 'Native Forces' was boost their attacking points to make up for Messrs Martini and Henry, none of this 24 points against 24 points! Like in our previous games we gave each side an overall Leader who would be the only leader on each side with a 'Trait', this they could apply to any Unit once a Turn. For the tabletop we based a British encampment near an oasis on a plain with some high ground and rough terrain, the British had a few quickly thrown up 'barricades' which gave light cover status.

"Fuzzy-Wuzzies Sah! Fousands of 'em!".
The British Gatling Gun Crew tackle the Mahdists led by Osman Dirka...

Mahdists Army (51 Points)
Commander Osman Dirka (making a second appearance) this time rated as 'Destined for Greatness'
5 x Tribal Infantry at 15 points
5 x Fierce and Veteran Tribal Infantry at 21 points
3 x Well Armed Veteran Tribal Infantry at 15 points

British Detachment (On Table 18 Points)
Commander Colonel Brown-Pants who was rated as a 'Damned Fine Fellow'
2 x Regular Infantry at 12 points
1 x Well Drilled Gatling Gun at 6 points

British Detachment (Off Table 12 Points)
1 x Regular Infantry at 6 points
1 x Highlanders at 6 points

This was going to be one big game, 196 Mahdists against 54 British! The British off board troops were available from Turn 2 and the Mahdists could enter eight Units on Turn 1 and the rest of their Army on Turn 2.

Please note from our previous experience we now play The Men who Would Be Kings with the below House Rules;
1. All Pinned Units retire half a move when initially Pinned and act as Gone to Ground while Pinned (note ALL Units GTG and for the whole duration of being Pinned).
2. If a Unit with multiple Pins fails to Rally reduce the Total Number of Pins by 1 for each failed Rally attempt (Units will always retain ONE Pin until Rallied).

AAR

The British deployed using their cover with an Infantry Unit on each flank and their Gatling Gun in the centre. The Mahdists advanced with a three of Units in their centre and five on each flank!

With amazing alacrity the Mahdi horde advanced (read high rolls for bonus At the Double movement) and they were quickly in range of the British who opened fire as soon as they could causing casualties but crucially not Pinning the Natives.

As the Mahdi got within short range of the British the air was filled with hot lead and attackers losses began to mount, one, two and then three of the advancing Units were Pinned and despite the Mahdi Units good morale their forward momentum was beginning to stall...then on Turn 7 a crucial roll changed the game, the Gatling Gun Crew failed to activate! There was a lull in the British Musketry! Seizing this chance the first Mahdi Unit contacted the British behind their barricades, this first charge failed to breakthrough but it inflicted losses on the British Unit. These losses meant the defensive fire started to dwindle. A second charge struck the British line, this too was unsuccessful but it weakened the British even more! 

The Mahdists now engaged the British left Flank in close combat, the game was in the balance! At this time the British reinforcements on their right flank slowed the Mahdists but they did not reinforce their left, they used their other reserve Unit to move into the encampment in the centre of their line. This weakness on the British left proved decisive, it was here the Natives got around the British defences! The situation began to crumble for the Brits. A shining light for the British at this point of the action was the heroic performance of Lieutenant George; after repelling four ferocious attacks and with his whole Unit slaughtered around him he gainfully fought on with his revolver and sword driving off the the fierce Mahdist warriors single handed, Victoria Cross material indeed! It required a direct order from Colonel Brown-Pants for him to retire to the rear and seek aid (and await his award presentation!).

Osman Dirka, the Mahdist Leader who had been quiet early in the game now came to the fore! Mopping the sweat from his brow and girding up his loins he personally led two great charges; the first overran a British unit near the encampment and the other smashed the Englishmen who had been successfully supporting their right flank, these successes along with the capture of the Gatling Gun after it apparently jammed again (read failed another activation) broke the sprit of the defenders! Colonel Brown-Pants ordered his men to withdraw, his intact Highland Infantry Unit complied while loosing off a final volley which decimated the Mahdist unit they targeted!

HUZZAH! (in Mahdi of course!)

Some Pictures!

The British Encampment is called to "Stand To!" suspicious Natives had been spotted!

Overview at the end of Turn 2 the Mahdi begin their advance (very quickly!)...

The Mahdists Right Wing...

The Mahdists Left Wing!

The undaunted defenders take a bead on the attackers...

Overview at the end of Turn 5...

During Turn 6 the crack of Martini-Henry fire increased...as did the Mahdists casualty rate!

The first contact! Lieutenant George's Unit receive the initial Mahdist onslaught and see it off with ease albeit whilst taking casualties!

But disaster looms for the British, at a crucial moment the Gatling Gun falls silent and the Mahdist seize the opportunity!


Meanwhile Lieutenant George's besieged men see off yet another charge!

They then pepper the never ending swarms of Natives before them!

The British left flank was still holding firm but needed assistance...

...and they failed to get any...they were overrun! The Mahdist Leader Osman Dirka leading the victorious assault in person!

Another Mahdist charge on the British left is repulsed...Lieutenant George himself sees the last of the Natives off with time to spare to twirl his moustache!

Not done Osman Dirka led a second charge defeating the British holding the extreme right of their line!

Colonel Brown-Pants ordered his Highlanders to withdrawal, which they did in good order!

The battlefield at the end of game!
Note the 'death disks' I use to mark casualties and are great at showing the flow of the action well we ran out!!! We resorted to using tipped figures to mark the losses! I have ordered another batch to ensure this doesn't occur again!

Summary
So a Mahdist win with 18 VPs to the British 7, the Umpire gave Lieutenant George a bonus VP for his heroic stand on the battlefield. The casualty count was frightening 87 Mahdists fell as did 37 British! The battlefield was certainly awash with blood! As it turned out we boosted the Mahdists force by a little bit too much BUT next time we have a really good idea on how to bias the forces of the gun armed guys versus paw paw and stick armed ones! So if the defenders have the same 30 Points as the British did this time we'd give the Mahdists 45. Also of note in this game we need to take into account the Leader Traits, being 'Destined for Greatness' Osman Dirka was twice able to advance Units and allow them to charge from quite a distance whilst Colonel Brown-Pants had no special effect on the action at all! Overall another excellent night thanks to the Men Who Would be Kings rules! Can't wait to return to the Sudan again...

Sunday, 10 October 2021

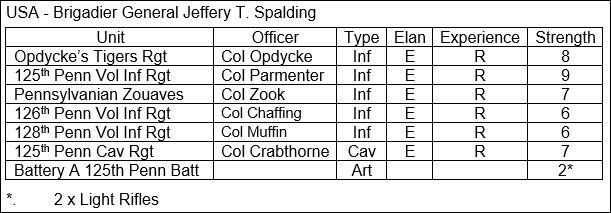
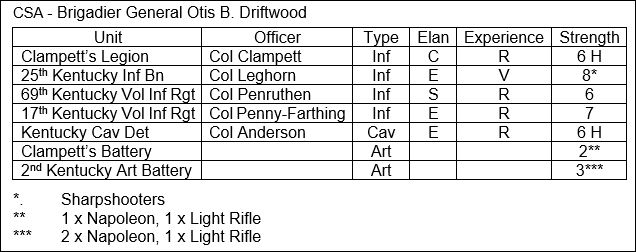
TSOG Longstreet Grand Campaign #2 - Game 2 AAR

Monday night after a rather tasty BBQ the TSOGgers adjourned to a pleasant evening of wargaming! We played Game 2 of our new Longstreet Grand Campaign! The player line up was as per our first game and everyone was fired up and ready for a tough fight!

Entrenched, Colonel Clampett's 'Boys' prepare to receive the Yankees, who were the Zouaves of Colonel Zook!

Onto the Game... The Battle of Twin Peaks

Scenario; The Hilltops
The CSA Won the Scouting Roll and elected to defend
Extra CSA Terrain 1 x Swamp, 1 x Rough Ground
Extra USA Terrain 1 x Rough Ground, 3 x Woods

Attackers George and Pete
Spalding Character Trait: Friend in the State House
 
Defenders Dave and Maurice
Driftwood Character Trait: Fire & Brimstone Preacher

The AAR

The Union Army of the Potomac pushed south into Confederate territory in 1862 and Brigadier General Spalding’s Brigade was in the vanguard! His orders included securing a pair strategically important hilltops known by the locals as the Twin Peaks.

Spalding reconnoitred the Rebel positions and decided on a massive attack using his right wing while his cavalry pinned the rest of the Rebel force in place, he was convinced this would see a quick victory, orders were dispatched and the attack began. Confederate General Driftwood was quick to see the Yankees intent and acted promptly redeploying his Regiments, he also sent a message to Colonel Clampett’s Regiment entrenched on the smaller of the Twin Peaks to hold at all costs and await reinforcements!

Initially the Federal Regiments moved as ordered making good ground and the Confederate right was successfully pinned as they hoped by the Cavalry, but and the Rebel artillery and reserve cavalry did moved to face their advance and assist Colonel Clampett’s men.

It wasn’t long before the Yankee right hook lost all co-ordination, the main columns experienced unexpectedly poor terrain that slowed them while lost orders and rivalries between Officers led to two uncoordinated (and unsuccessful) charges on Colonel Clampett’s stout Confederate Boys! After these events Colonel Zook his Regiment broken and looking dishevelled was heard to comment, "Those damn Rebs they're immovable just like a stonewall!"

The situation was now looking worse for Colonel Spalding and his Yankees but even though the Confederate Brigade had redeployed to face his main attack Spalding continued with his original plan and launched a second charge! This onslaught failed too and under heavy Rebel fire the defeated Federal Regiments broke and Spalding's entire Brigade retired leaving the Rebels in command of the crucial high ground.

A stunning victory to Driftwood's Southerners! They had inflicted heavy losses on the Federals and beat them back decisively! A defiant Rebel Yell echoed across the battlefield!

Some pictures of the action!

The initial Yankee deployment looked promising! Four Infantry Regiments with artillery support facing a single Confederate Regiment!

The best Confederate Unit was on the wrong flank so unable to face the main Union force, in the distance behind the trees the Yankee cavalry can be seen.

The Yankee artillery target Clampett's Regiment as the infantry march past them, unfortunately the guns did little damage!

The Union columns knew there was rough ground before them but the swampy terrain behind that was a surprise and this was to cost them dearly!

Rebel Colonel Clampett ordered his men to 'dig in' on their high ground as the Bluebellies deployed before them! 

The Yankee Cavalry launch their own flank attack!

Colonel Spalding's grand attack unfolding...

The first Union charge on the smaller of the Twin Peaks hill failed as one Regiment failed to get its orders in time and the other attacking alone was easily repulsed by the Southerners!

The shattered Pennsylvanian Zouave Regiment (at the bottom of the hill to the right) retires after getting no support during its charge taking heavy losses!

The Yankee Cavalry's grand ride continues!

After the Yankees initial charges against the Rebel hilltop position failed they prepared to advance again but now that Confederate reinforcements had arrived to cover the rear of the hill and any chance of a breakthrough had all but evaporated!

The Union Cavalry continued to play cat and mouse with Rebel Infantry they faced.

Colonel Clampett's Regiment continue to hold their hilltop position despite being changed twice, bombarded and fired on! To the rear of the hill the Yankees form up to advance again all the while taking casualties from fire!

The Confederate Right wing was tied down successfully by the Union horsemen but it was of little significance in the final result!

The Yankees second large charge was a gamble which they lost, here you can see them attacking with inferior numbers against defenders supported by artillery! Still it looked good for the Northern Reporters!

Well a decisive victory to the Confederates losing only five bases to the Federals seventeen! Dave's skilful interrupt card play really ran the Union attack off the rails initially and with the Rebels reserves redeployed the Yankees were never able to recover! Still the Yankees managed to coordinate a couple of very large (albeit unsuccessful) charges giving them a slight edge in epic Points in the end. Also the Union's heavy losses and a rather lack lustre post game 'process' will make game three in the Grand Campaign interesting! They will start it with four Regiments of four or less bases, a rather fragile force! The Confederates will have a more compact yet intrinsically stronger group of Regiments! Stay tuned for the next game!

Post Game process was completed and the below resulted.

USA Epic Points 6
CSA Epic Points 5

BG Spalding Promoted
BG Driftwood Promoted

New OOBs for Game Three


Wednesday, 29 September 2021

ECW AAR - Baroque Rules

Monday night we tried out and ECW game using Baroque Rules!

Both sides had 600 point armies created using the 'Army Lists' in the Rules.

Each side deployed hidden from the other and it turned out that both had roughly equal centres and beefed up right wings.

The game was aggressive (as we wanted to test the rules to the limit). Initially the Royalist Right ploughed through the Parliamentary flank and threatened to roll up their entire army whilst a similar result was occurring on the other side of the table as the Roundheads Right broke the Royalist Left! A bloody and close engagement ensued that saw the Royalists just win!

Some pictures of the action!

The Parliamentary Infantry form up in the centre of their battle line...

The Royalist Army (to the left of picture) boldly advance as the Parliamentary Leader calmly sipped on a frothy beverage!

Brave Cavaliers crashed into a Roundhead Cavalry Unit soundly defeating going on to overrun the artillery nearby and then rode wildly off and played little further part in the game!

We discovered Cavalry should not enter woods, well actually we knew that beforehand but retreating and pursuing Mounted Units sometimes have a mind of their own!

Parliamentary Infantry advance on their opponents!

The Royalist Horse begin to roll up the Parliamentary line, here a Roundhead Pike & Shotte Unit is hit in the flank by a Mounted Unit while Royalist Infantry advance to their front!

Confusion reigned as the battle reached its climax with both sides Infantry fearing Mounted Units outflanking them!

So an entertaining game was had, we have a couple of rules questions to resolve but will definitely have another go with them. There was quite a lot more movement than we expected especially amongst the mounted units, while the infantry slugged it out! The good thing is mastering these rules will allow us to play Ancients Games as Maurice has an extensive collection of those and these rules are basically the same as Impetus that covers that era!