Monday, 20 February 2017

1/56 German 5cm Granatwerfer 36 Scratchbuild

Okay so I've almost finished assembling and painting all my Italeri WW II Germans but what to do with dso many prone figures?

Well I've made some snipers...

I've also got an Artillery FOO

I of course went with the standard MG34 duo, not super useful in gaming but...

And I've still got two left grrrrr...

Alright how about using them with a Granatwerfer 36 on a base and have a kneeling figure on a separate base that can be a number two or when no mortar is required can be a regular Soldat...

I got my 1/6 Dragon 5cm Granatwerfer 36 and scaled it down to make this with some styrene, pins and brass tube..


It's not perfect but will suffice for gaming!


I'll now build a second one and a few plain ammo boxes.

Saved buying a specialised figure and used up the last of my prone figures I find them very limiting for gaming!

Cheers (lieterally!)

Wednesday, 8 February 2017

Return To Song of Drums & Shakos AAR #2 Austrians vs Russians!

Our last Monday night game theme was Napoleonic's and we trotted out some 28mm figures and the Song of Drums and Shakos rules. For something different we had Austrians up against Russians.

The Situation:

Russia October 1812

The Franco-Austrian forces of the 7th French and the Austrian Corps clash with the Russians of Lieutenant Generals Essen's Corps around Voskrinitza. Near the battles end Russians of the Staroinguermanlandski (!) Infantry covered the forces withdrawal, there were many skirmishes as the Austrians pressured the Russians!

The Troops:

Russia
Line Officer 60pts
Line NCO 56pts
4 Line Grenadiers 128pts
5 Line Musketeers 150pts
Point Total 394

Austria
Line Officer 60pts
Grenzer NCO 70pts
4 Grenzers 180pts
4 line Infantry 96pts
Point Total 406
The Game:

Since this was a skirmish both sides entered the table top randomly and we both came on at the opposite ends of the same side of the battlefield separated by a forested 'hill'.

The first few turns saw a lot of jockeying for position. The Austrian Jaegers using their light troop abilities got into the woods on the hill and got off the  first volley, this was followed by a volley from the Austrian line troops the first Russian casualties occurred.

The Russian return fire was not very accurate and as they started to suffer from lethal Austrian volleys they decided to close on the Austrians as their Grenadiers would be at an advantage in melee!
At this point welcome Sergeant Snake-Eyes! A crucial volley was required to cover the advance of the grenadiers, it was decided to throw two D6 to get a couple of actions, there was a cry of 'Anything but a double one will work'...up came double one! The Austrian got in another effective volley as a result!

Undeterred the very next turn the Russians pressed forward again, this time Sergeant Snake_Eyes tried to gain three actions so rolled three D6s again with anything but a one resulting in success. up went the call "anything but a triple one and we're good" up came three ones! I've never seen dice rolling like it and I doubt I'll ever see it again! Despite the Russian Sergeant and his infantry failing to activate the Russian Grenadiers got to grips with the Austrian infantry and they were up in the melee when their morale cracked...the game was over!
Thankfully for Imperial Russia Sergeant Snake-Eyes survived so he will be able to grace our table top again at some point!

Pictures:

Unfortunately I took the nights pictures on my partner's camera and she's lost the download cable so there's not much in the way of pictures at the moment. Once she finds the cable I'll update the post! I took these end of game pictures as I packed everything up.

Overall view, losses were 6 Ruskies to 1 Austrian. you can see most of the surviving Russians in flight...

The Austrian view of the end of the battle...

The Russian view at the end of the game, Sergeant Snake-Eyes is on the far right!

Next gaming night will be ACW themed using Longstreet rules!

Tuesday, 13 December 2016

TW&T (Troops, Weapons & Tactics) Play Through

I have played a few solo tests of The Two Fat Lardies Troops, Weapons & Tactics rules and last night rolled it out for our Monday Night game. These rules have been superseded by Chain of Command but after reading both I had a leaning towards TW&T especially because of the way Leaders/Big Men are treated. The other reason it appealed to me is many of its processes parallel the I ain't Been Shot Mum rule set which I like too!

Everyone seemed to be happy with how the game played but it was a tad slow as we were all learning the rules as we went. I umpired and we had single German player defending against two attacking British players. I made a few blinder mistakes while umpiring/training, not adding a German squad's card to the action deck when it entered play was he biggest (this meant it spent a few 'rounds' taking punishment idly sipping on ersatz coffee), also I missed some end of turn units reserved actions, I didn't have a reinforcement section available for the attackers when that random event occured (crikey a 1 in 36 chance!) and lastly not going through the pinning fire process...if the other guys want another game set up I'll definitely organise one, as it is I'll continue to play it solitaire in the hope of mastering the rules.

The scenario was kept simple no vehicles and a minimum of complicating rules i.e. only integral squad/section snipers were used etc:


Operation Wuzburg, Belgium August 1944


Late August 1944 the British 11th Armoured Division pushed toward Antwerp against stiffening German resistance from the 15th Army. The 1st Battalion, Herefordshire Regiment from the Divisions infantry support Brigade was assigned the mission to clear their left flank.

A coastal Wuzburg radar station that had survived an air raid was in the Herefordshire Regiments area of operations. Divisional Intelligence reported the radar base was lightly held by troops from the 712nd Fusilier Battalion, 712nd Grenadier Division LXXXIX Corps. A reinforced Platoon was detached to take the radar station...

The British
A Reinforced Platoon
1 x Platoon Leader
4 x Infantry 'Good' Sections (each with a leader)
1 x Light Mortar

Germans
2 x under strength 'Good' infantry squads (each with a leader)
Variable reinforcements - deployed at the discretion of the Umpire
1 x Platoon Leader
1 x under strength 'Good' infantry squad (with a leader)
1 HMG

Victory Conditions
The British must occupy the Wuzburg radar station or break the German forces.

Some pictures, I took very few as running the game kept me busy!

The battle field, the road runs east west with the west edge of the gaming area closest in the picture, the radar station defences are aligned against an attack from the north i.e. the coast...but the British will be entering from the west!

The first phase of the of the battle the 'Blinds ' manoeurve the British seek out the Germans true positions while the Germans 'lay low'...

The first Jerries are spotted an LMG team!

Overall view of the game with all the British and most of the Germans on the table, 

Germans left flank unit cunningly using a hedge for protection...

View of the battlefield from the Wuzburg Radar station, the centrally placed German LMG have been knocked out and in the background the Poms are just visible...

In the game the British held back and preferred to wear the Germans down with fire rather than rashly rush into an attack on the radar station, it slowed things down but with no time limits on their attack made sense, I added two German HMGs onto the field to liven things up a bit but time beat us and the game wasn't concluded, mind you it was just a rules run through so I wasn't fussed.

Tuesday, 6 December 2016

VSF AAR, Model Landship and Terrain

Hey All I have posted some stuff over at "Captain Darling's Miniatures Emporium" as they are VSF themed..

Our last game The Battle of Denmark Crossing"...

http://captaindarlingsminiaturesemporium.blogspot.com.au/2016/11/landships-clash-battle-of-fubar-aar.html

Some Statues for the FUBAR VSF PULP scenario I'm working on...

http://captaindarlingsminiaturesemporium.blogspot.com.au/2016/12/scenery-building-statue-or-two.html

And my new Landship model...

http://captaindarlingsminiaturesemporium.blogspot.com.au/2016/12/hmls-swiftsure-first-modular-landship.html

Hope you take the time to have a look!

Wednesday, 30 November 2016

WWII Desert: Operation Brevity – Top of Halfaya Pass - 15th May 1941


Operation Brevity – Top of Halfaya Pass - 15th May 1941
(1/72 using Rapid Fire 2 rules)

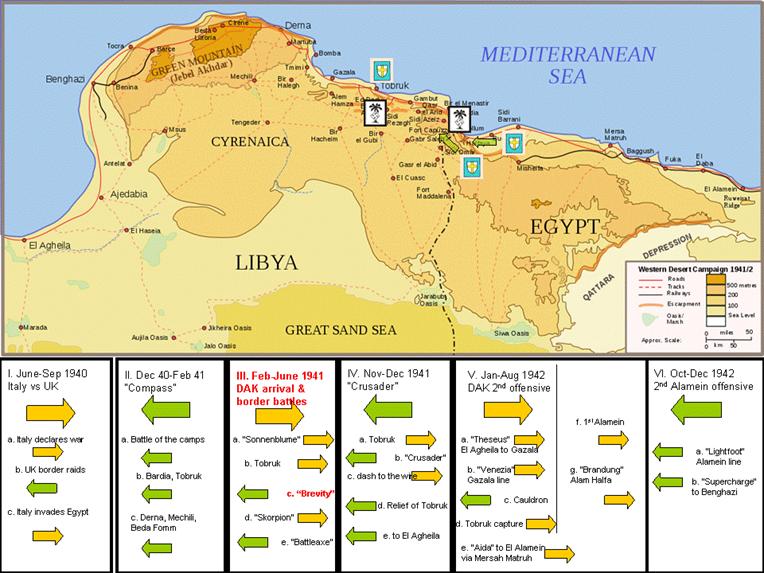
Operation Brevity was conceived by General Wavell as a preliminary offensive in mid 1941 to gain control of the Egypt-Libya border, as a starting position for a larger offensive (Battleaxe) to break the siege of Tobruk. The strategic situation is shown in context of all engagements in Fig 1. 


Figure 1


This scenario played out the action at the top of Halfaya Pass inside Egypt, near Sollum. Dave was scenario designer and umpire, Stu played the Axis, and Pete and Alan the Allies.

TSOG had previously played the action in Operation Brevity at the bottom of Halfaya Pass and it was an Allied victory, as per history. The location of Halfaya in the border region, the terrain at the top (north-east) and bottom (south-west) of the pass, and some images of the escarpment separating them are shown in Fig 2.


Figure 2

The terrain at the top of the pass is shown in Fig 3. The Western Desert Force is attacking from the right and initially hold one control point. The German-Italian defenders hold four control points. Hence the game commences as an Axis substantive victory.  

The solid line road up the escarpment, through the Village and south is a ‘good track’. The dotted road running south-west from the Village is a ‘poor track’. The yellow area is soft sand, the dotted areas rough ground, and the dashed ovals are rocky outcrops. Each square is 12”, representing 600 metres.


Figure 3

Order of battle;

Allied
Elements of the 22nd Guards Brigade Group – 4th Indian Div – Western Desert Force

  • No overall HQ on board, but command & control derived from the Allied control point.  C2 level: 1D6 = 4,5,6 (50% success chance). 24” range to Infantry Battalion or tank squadron HQs which have a 12” range to their companies or troops.
  • 2nd Battalion Scots Guards: 3 rifle companies (A,B,C) and Support Company (D) [Pete]
  • C Squadron, 4th RTR (3 troops of Matilda II and HQ troop of Vickers MkVI) [Pete]

  • 3rd Battalion Coldstream Guards: 3 rifle companies (A,B,C) and Support Company (D) [Alan]. (An optional reserve selected by Allies)


Axis    

Elements of 15th Panzer Div   


and Ariete Div  


(C2 level: 1D6 = 3,4,5,6 for DAK (66% success chance) and 5,6 (33% success chance) for Italians)

  • BHQ for the 15th Kradschützen Battalion (overall command & control)
    • 1st Kompanie
    • PaK Kompanie (section of 37mm PaK-36 and section of 50mm PaK-38)

  • 2nd Infantry Company (reduced), 12th Bersaglieri Btn, 8th Bers. Regt, Ariete Div.
  • Artillery Battery, 1st Gruppo, 24th Artillery Regt., Ariete Div (100mm 100/17 battery)

The above Axis units can be deployed dug-in.

  • Optional Reserve: Intended for the entire border defence. So if taken for the top of the Pass then certain Allied losses must be inflicted or a penalty is incurred, as they are not defending another point on the front. Deployed in the open (not dug-in).
    • Batterie, 18th Flak Regt., 15th Pz Div. (88mm Flak 36/41 battery)  [Taken by Axis. Penalty of having to heavy damage or destroy two troops of Matildas.]
    • Batterie, Artillerie Regt 33, 15th Pz Div (105mm FH-18 battery)  [Taken by Axis. Penalty of having to destroy or rout two companies of allied infantry]

So the Axis were outnumbered, but commence mostly dug-in. The Allies were on a static command & control anchor, with only 50% success chance and range just short of the road and control points. The Allies also had a time constraint of only 6 guaranteed turns (4hrs 30min) with a sliding chance of operations being stopped after that.

As usual we commenced with a briefing shown in Fig 4 before the Axis defenders deployed.  The new DAK and Ariete symbol dice can be seen on their first outing.


Figure 4


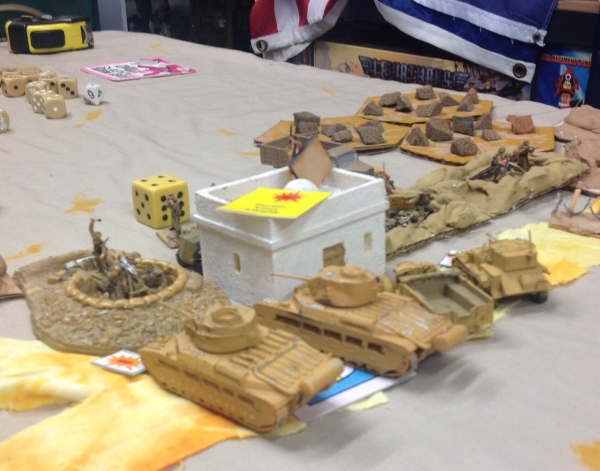
Battle opened with C Squadron 4th RTR advancing on the centre, between the sandy ground and rocky outcrop seen in Fig 5.


Figure 5

The Axis gunners knew the Matlidas formidable reputation and held fire until they were within medium range (1500 m) of the dug-in guns along the road. The 88mm battery could engage at much longer range (3000m) but with low probability of hits, and so also held fire until the other guns commenced.


Figure 6

The fearsome 88’s did not live up to their reputation and the section of PaK-38 50mm took first blood, brewing up troop A of 4 RTR, seen in Fig 7. For the first time the Western Desert Force realised the Matlidas were no longer ‘Queen of the Battlefield’ as they had been in Operation Compass.

Figure 7

4 RTR survived their morale check and lumbered forward aiming at the Village and subsequent axis AT gun attempts on them were unsuccessful. The Scots Guards entered and drove at full speed towards the broken ground on the Axis left flank, before disembarking into cover on the rough ground, shown in Fig 8.


Figure 8


Meanwhile, the Coldstream Guards had entered on the southern side of the soft sand, to attack the Bersaglieri on the Axis right flank, shown in Fig 9.


Figure 9

The weaker Allied command & control began to let them down and slow their movement as they reached the end of the automatic C2 ranges.

Fig 10 shows the entire action as the Coldstream Guards on the Allied left are closing with the Axis position behind the control point at the southern edge. The Scots Guards were working their way on foot through the rough ground on the Allied right covered by their 3” medium mortar section deployed in the open. 4 RTR positioned themselves behind Halfaya Village, to block line of sight from 18th Flak Regts 88’s.

The Axis gun line of PaK-38s and Italian 100mm behind the road continued to engage the Matildas but with no luck. The PaK-36 ‘door knockers’ and anti-tank rifles had no hope against Matildas and engaged the transport of the Coldstream Guards support company D, destroying their trucks and forcing them to disembark. The Axis infantry are holding their fire due to not being able to see the Scots Guards in the broken ground and waiting till short range to reserve fire on the Coldstreams.


Figure 10

Figure 11 shows two companies of the Coldstream Guards disembarking to close assault the under-strength 2nd company of the 12th Bersaglieri Battalion. Reserve fire slightly depleted the Guardsmen, but the Bersaglieri were annihilated, heavily outnumbered in epic hand to hand fighting.


Figure 11

Fig 12 shows the action from the view of a Fiesler Storch. The control points in the Village and at the head of the Pass (behind barbed wire) can be seen still in Axis hands, although the Coldstreams have overrun the point at the southern end (2-3 = Axis marginal victory).


Figure 12

Two companies of Scots Guards, the MG section and BHQ can be seen in close-up in Fig 13 working their way through the broken ground. The reserve company is still en-trucked.


Figure 13

The Matildas advanced over the control point on the edge of the Village (3-2 = Allied marginal victory) engaging infantry with hull MGs, seen in Fig 14. The Vickers MkVI of the HQ troop joining in and losses amongst the 1st Kompanie in the Village forced a morale check. The Scots Guards reserve company also drove forward to disembark and attack the Village.


Figure 14


The Scots Guards breached the wire near the head of the pass and took the control point on the northern end of the road (4-1 = Allied substantive victory, plus 2 victory levels as 2 Matilda troops and 2 infantry companies had not been destroyed despite the optional reserve gun batteries).

So history was repeated, with the Allies taking the top of the Pass. Their considerable numerical superiority meant the Axis were probably less than 50% likely of winning.

However, a stunning platoon level victory was achieved by the Pak-36 crews of the 15th Kradschützen Battalion who, after their guns had been destroyed by mortar fire, repelled a close assault by a company of Coldstream Guards, despite the gunners lack of training in close combat and the Guards elite status.  Iron Crosses all round !!!


Figure 15


The next game was the Axis counter-attack in Operation Skorpion to try and re-capture the Pass.