Wednesday, 3 November 2021

Bita Paka Part 3 the AAR - The unfortunate rigidification of Lieutenant Bond


Admiral Patey

Fleet commander ANMEF

Colonel Holmes

Force commander ANMEF

Rabaul 11th September 1915


From : Commander Beresford

Kabakaul landing 


Following on from my earlier report I am now forwarding a further update covering the final push late this afternoon onto the transmitter station at Bita Paka.


As previously advised I ordered Lieutenant  bond and Captain Travers from the army intelligence unit with a half company of ratings and the machine gun section to the Bita Paka clearing with the objective of taking the transmitter. They were accompanied by the German Lieutenant Kempf who had undertaken to try to convince his compatriots remaining in the clearing to surrender. I remained with the bulk of the shore units at the cross road in case reinforcements were required.


Lt Bond enters the clearing with Kempf


Bond and  Travers along with petty officers Sandys and Palmer and an 18 man squad of ratings plus the machine guns advanced into the clearing only to have Kempf escape from their custody. Travers reported that upon entering the clearing they encountered a small party of Germans and native police. Kempf ran to this party and they immediately dispersed into the huts and surrounding undergrowth. Then bond, totally ignoring those parts of my orders that required him to secure the huts and arrest the Germans, and indeed apparently ignoring the enemy directly in his vicinity, led his entire command down the track at a fast run in the direction of the transmitter. Travers reports that he threw out no flank guards and secured none of the huts as he progressed.


Lt Bond charges off like someone in search of a DSM

Travers also reported sniper fire from the surrounding jungle which wounded several men around the police hut. As bond advanced down the track he lost several more men to intense sniper fire from the surrounding fields. He did not do anything about the snipers and appeared intent on capturing the transmitter station in a coup de main. Travers last saw bond as he assaulted the transmitter station several hundred metres away. It was also noted that one small group apparently led by petty officer palmer had detached from bonds team under heavy fire and moved into one of the surrounding huts. Fire from the surrounding huts had intensified as travers began to set up his machine gun in the small clearing. 


Casualties start to mount from snipers


At this time I led the  first group of reinforcements into the clearing. It was immediately obvious that bond had failed to secure his lines of communication and that our advance into the clearing was seriously in jeopardy. Captain travers came under intense fire from a large unit of Germans in the hut to the left side. His entire machine gun team became casualties in the first few minutes. Luckily he survived. However it was clear that we could not rely upon the extra firepower from the machine gun.  Lieutenant Gilliam brought his company with me and that of midshipman Buller. Gilliams unit also came under intense fire. However when joined by bullers unit we were able to both fall back to the police hut and eventually silence the  Germans on the other side of the small clearing.


Commander Beresford shows the Germans some cold sausage steel


Neither travers nor myself were  present at  nor party to, the rest of the action as it unfolded near the transmitter. I am reliant upon statements provided by several wounded ratings who made their way back to the crossroads later this evening. Once it was obvious that bonds attack on the transmitter had failed I decided to retire the remainder of the force back to the crossroads and start afresh tomorrow morning.


Germans and bodies everywhere so Beresford retires to write a report blaming everything on Bond


Statement from able seaman Ferrier 6th company


I was with Lieutenant bonds company as we entered the clearing. As we did so the German who we had as a prisoner shouted something then ran forward Then the Germans who had been standing there ran off into the nearby huts and fields. Lieutenant bond ordered us down the path to the transmitter. petty officer Sandys asked whether we should throw out flank guards or secure the huts as there were obviously Germans about.  Bond said that the transmitter was the important objective and that we needed to move quickly. He said that Commander Beresford would deal with any Germans we bypassed. 
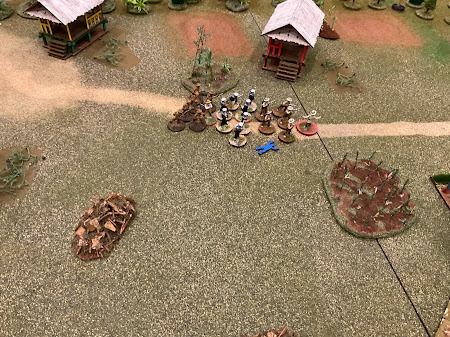


Sniper fire was getting hotter and seaman Brennan went down.  We moved at a run down the track. With no cover we took more casualties from the snipers.  Eventually petty officer palmer took the remains of his squad at a run to a hut to the left of the track. We had reached a point about a hundred yards from the station when all hell broke loose. We could see German troops in each of the huts including those behind us.  They just seemed to rise up out of the ground like ghosts.  We were surrounded. The fire intensified and more men were hit. 


*ed. It should be noted that lt bond was actually in a position to win the game outright. The Germans got to throw SHiT dice at the end of each PHART phase. The chances of full scale German retaliation increased as the Australians secured huts, arrested Germans, and got closer to the station. Bond secured no huts and arrested no one ; so the Germans merely added some more snipers and had a go at blowing up the transmitter. By coming within a move of the station however the Germans got to throw on the table with a 75% chance of KRAP happening (Kempf rallying the troops and commencing the resistance). The German failed the roll and added another GRIT token for reinforcements. Pete playing the German only had 2 GRIT points but succeeded in his roll …..the PHART phase ended, the Germans were placed in their set up positions and the reinforcements entered. Bond was within 1 run move of outright victory.


Lieutenant bond waved his pistol, ordered us to fix bayonets and we charged over the sandbags in front of the station and got inside.


We found two civilian engineers who were  dismantling the workings. We pointed our rifles at them and put them in a corner under guard.  


Outside we could hear more German yelling and the gunfire stepped up. P.O. Sandys ordered us to fire at a large party of Germans that had emerged down the Toma road. We missed and they charged round the front of the station and tried to get in through the doors and windows. 


We held them off and knocked a few down. However there were too many of them and they eventually forced their way in. I was hit in the shoulder and collapsed under one of the tables.  


I saw P.O. Sandys and Lieutenant bond both firing their pistols in the main hall before going down under a hail of blows. It was clear that all the men from the two squads with Lieutenant bond were either dead or seriously wounded. I had no idea what had happened to P.O. palmers team but I suspected the worst. 


The Germans got the doctors and medicos to us pretty quick. However it was dark and  I had rolled further beneath the transmitting table and hid till nightfall. I dragged myself out and back down the trail. I met up with seaman Lucas from P.O. palmers team who had also sustained quite a serious wound. I asked about palmers and  he said they were all dead.  It was clear that the entire command had either been killed or taken prisoner. We moved down the track and eventually found Commander Beresford. 


It is clear that by ignoring my orders Lieutenant bond placed his entire command and the success of this operation in peril. My estimate is that as many ten ratings have been killed and possibly a further twenty seriously wounded. If bond were not dead I would recommend he be court marshalled. If by some chance he has survived I would recommend that he be patched up and then court marshalled. It worked for Ned kelly.


Commander Beresford RAN


The lower half of Maurice aka commander Beresford thinking of various forms of character assassination 


Bita Paka Part 2 - Scenario, PHART ing around in Rabaul

To give what could have been a simple encounter in the jungle some life and zip we dreamed up some complications. The real issue is the tension between the Australians waltzing in and seizing the transmitter and the Germans reacting.

So we came up with PHART and it’s associated ‘out lardying the lardies’ deeply regretted puns*. 

Note: because we are absolute bastards no one gets to fire at each other until the PHART phase ends  

*ed. We don’t regret them for an instant, really.

Pre-game Historical Australian Redeployment Turn

Pre-game the Germans will


Throw for BUTT total (10d10 to determine damage level for transmitter).


Throw for initial snipers (1d4)

Snipers fire from one of the 6 flag markers to be randomly determined each PHART phase


Randomly allocate the German units to the various locations but don’t put them on the board

(barracks, 4 huts plus the station, trench and banana grove. Max 1 unit per hut)


The Australians then proceed to move their units; capturing Germans, securing the huts etc.


Following the Australian PHART phase the Germans react by throwing a SHiT dice (1d8).


The Germans will be affected by the encroachment of the Australians. Depending on how they are viewing the ‘sweet and meet to die for ones country’ line, their reactions may be positive or negative.

This is simulated by adding one dice with ‘+ or - or 0’ to the SHiT roll, for each of the three possible variable conditions met in each turn. If the condition isn’t met the Germans don’t get that variable dice. The SHiT roll is amended by the nett result accordingly. 

The three conditions are :
  1. German prisoners have been taken
  2. The Australians have taken sniper casualties 
  3. Kempf is still at large

Schutztruppe Historical Initiative Table 

D8

No huts secured 

Barracks  only 

Hut 1

Hut 2

Hut 3 

Hut 4

Station (or within 9)

1

GITS

GITS

GITS

GITS

DICS

GRIT

GRIT

2

GITS

GITS

GITS

DICS

GRIT

GRIT

GRIT

3

GITS

GITS

DICS

GRIT

GRIT

GRIT

KRAP

4

GITS

DICS

GRIT

GRIT

GRIT

KRAP

KRAP

5

DICS

GRIT

GRIT

GRIT

KRAP

KRAP

KRAP

6

GRIT

GRIT

GRIT

KRAP

KRAP

KRAP

KRAP

7

GRIT

BUTT

BUTT

BUTT

BUTT

BUTT

KRAP

8

BUTT

BUTT

BUTT

BUTT

BUTT

BUTT

KRAP


The possible SHit outcomes are:


GITS:

Germans in trees shoot 

Add 1d4 snipers to pool


Sniper total is then allocated to a random location in the jungle and those snipers who have a line of sight to a target may shoot


GRIT:

German reinforcements introduction token

Add 1 to GRIT total 


At the end of each PHART move the German player throws a d6 to see if reinforcements enter. They must throw equal to or less than the current GRIT total for the reinforcements to enter.


BUTT:

Blow up the transmitter token 

Add 1 to BUTT total


At the end of each move  (including PHART ) the German player throws a d6 to see if damage is caused to the transmitter. Equal to or less than the current total = 1d20 damage


DICS:

Deploy incredibly cautious Schutztruppe 

1 random German unit is placed on the board (either in its designated location, or, if that location is occupied by Australian forces, within 1 manoeuvre move of the location)


KRAP:

Kempf rouses all patriots

PHART phase ends and game begins 

Units in ARSE mode will immediately fight a melee


ARSE (ARREST LOCK)

Units coming within 3 of each other will immediately enter the ARSE phase (Arrest, Restrain and Secure). The Australians will attempt to arrest the Germans turn until either the whole unit has  been arrested or the PHART phase ends. If they are still unrestrained when KRAP happens or the Germans start firing, they will immediately fight a round of combat


The pregame ends when either the German player makes a successful GRIT roll , the Transmitter is destroyed, the Australians occupy the station at the end of the Germans reaction turn, or KRAP happens.


Note that if the Australians occupy the station and it’s relatively intact at the end of any German turn, they automatically win. 


So now you have all the information you need to enjoy Part Three :  the unfortunate rigidification of Lieutenant Bond.

(Spoiler alert anyone ?)


Friday, 29 October 2021

A 'Bita' action in the South Pacific Part 1 - Historical Background, Rules & Forces

Aussies first action in WW1

Bita Paka (Rabaul) Part 1 - Background

In which the gits are introduced to some obscure history and the characters for the forthcoming game 

This week takes the old gits back to September 1914 and another real life inspired minor action that, if it wasn’t for the likes of war gamers, would be relegated to the rubbish bin of history. 

One of the old gits specialises in researching weird and unusual actions and turning them into passable versions of beer and skittles war games. This is accompanied by elaborate highly detailed terrain, rule variations requiring a read through by a team of very expensive city solicitors, collections of specialised figures that leaves one wondering to which other use they could possibly be put, and enormous amounts of chips and lollies. 

Much has now been written about the opening actions in WW1 undertaken by the Australians in New Guinea. Charles Eckart wrote a quite decent summary of the opening incident in Rabaul in one of the Too Fat Lardies specials a while ago. A great deal of additional information has also been collected by the Australian War Memorial and associated history groups in recent years.


To Summarise:


The Australian government put together an expeditionary force in 1914 to take the German possessions in New Guinea and Rabaul. This force consisted of a makeshift military unit of approximately 1000 men and six naval companies totalling roughly 500 men from various Australian  craft, as well as the craft themselves. Several Capital ships and the submarine AE2 were included as there was a threat from the German Pacific fleet. The Germans did not have a standing militia in any of their pacific colonies; only a police force and German volunteers. 


On 11 September the Australians landed in Rabaul. Naval companies were dispatched inland to locate and destroy the German transmitter station at Bita Paka. What followed was a running skirmish and several encounters (that could be called battles if one squinted hard enough) lasting most of the day. The trail to the station wound narrowly through dense and in some places impenetrable jungle and the force was plagued by snipers and well sited German trenches. The action had everything a war gamer could want ; trenches, snipers, pipe bombs, urgent reinforcements including the ships cook and staff (most were issued with ‘a pistol and a cutlass’, however the cook insisted on using a very big ladle), senior officers leading  bayonet charges, people yelling at each other incomprehensibly and so forth.

Eventually, the German forces had either been dispersed, surrendered, or pushed back.  In the final action of the battle a half-company of naval ratings with the Machine Gun section, under Lieutenant Bond was sent to take possession of the wireless station at Bita Paka. Remaining resistance was very weak and a German carrying orders to dismantle the wireless was captured. At Bita Paka the equipment was found undamaged though the masts had been cut. 

The rest, as they say, is history.


The Bita Paka action could be played as a series of smaller linked actions along the path culminating in the final push to the transmitter station. In this way the Australians would have to fight through each obstacle while controlling losses. They would be mindful of  their need to get to the station before it was destroyed.


However because we are contrary buggers who are never satisfied with anything simple we thought that another way was to go to the end and see what might have happened if the Germans had managed to offer something approaching resistance at the station itself. They had the troops; what they lacked was the leadership and the morale.


When Lt Bond pushed down the track into the clearing the only German Officers remaining were either captured, killed, or ten miles away guarding the capital at Toma. Resistance at the end was tepid to put it mildly.  However the Germans still had a number of native snipers loose in the jungle as well as some 20 German volunteers and 100 native police at the Bita Paka clearing. In addition The Governor was at Toma, ten miles away with a further 10 Germans and an unknown number of native police (estimates vary but it was probably somewhere between 20 and 100 men).  


However Governor Haber did not order his reserve to Bita Paka, and no local leadership was present to continue the fight. Haber formally surrendered several days later without further resistance. 

Our “what if…” scenario therefore starts at the point where Lt Bond advances his small force down the path and into the clearing. Upon entering the clearing near the police barracks, Lt Bond does not disarm the Germans (not winning a DSO in the process). Instead Feldwebel Ritter manages to call out a warning before being gunned down. Ignoring his undertaking to end resistance and surrender Bita Paka (even if he had the authority) Leutnant Kempf knocks his two guards to the ground and dashes across the compound to rally the troops around and in the barracks.

Feldwebel Schipmann immediately informs him that a runner has been sent to Toma for the rest of the force and that an engineering team is dismantling the transmitter. There are also reserves surrounding the Transmitter Station itself but he is unsure how many. 

Their objective as it has been all day is to buy sufficient time to ensure the transmitter is destroyed or at least rendered inoperable.

The good Leutnant turns to his inadequate force of native police and volunteer Schutztruppe and exhorts them for one last effort for the Fatherland.

The game, as they say, is afoot.


The Table

Containing the Bita Paka clearing surrounded by dense jungle. The transmitter station to the left next to the Toma road. The Australians are entering to the lower right. In the clearing are a party of Germans discussing what to do about the Australians. It is at this point Kempf breaks free and the game begins. The large church could either be a portent or just hasn’t been cleared away yet. Mind you I would have thought a cathedral would have made a very good tent indeed. 

The Protagonists 

This a designed as a demonstration game with the guests playing the three Australians (or four if you put Veale into the mix).

Lt Bond RAN

Lt Kempf


Commander Beresford RAN

Lieutenant Gilliam


Captain Travers 

The Rules

Heavily modified and simplified Iron Ivan Price of Glory WW1 skirmish 


The Combatants 

Australian Naval & Military Expedition (Rabaul September 1914)

Figures

Marksmanship

Valour

Courage

Weapon

Commander Beresford

1

5

4

9

Webley

Marine guards 

2

5

SMLE Rifle

Lieutenant Bond

1

5

4

8

Webley

6th Coy 1stsection 

6

5

4

5

SMLE Rifle

(Midshipman Collins)

1

5

6

6

Webley

Lieutenant Gilliam

1

5

4

7

Webley

6th Coy 2ndsection 

6

5

4

5

SMLE Rifle

Petty Officer Palmer

1

5

4

7

Webley

3rd Coy 1stsection

6

5

4

5

SMLE Rifle

Midshipman Veale

1

5

4

6

Webley

3rd Coy 2ndsection 

6

5

4

5

SMLE Rifle

Petty Officer Sandys

1

5

4

7

Webley

4th Coy 1stsection 

6

5

4

5

SMLE Rifle

Midshipman Buller

1

5

4

6

Webley

4th Coy 2ndsection 

6

5

4

5

SMLE Rifle

Captain Travers 

1

5

4

7

Webley

Machine gun section 

3

5

4

5

Vickers HMG/SMLE


German Schutztruppe (Rabaul September 1914)

Figures

Marksmanship

Valour

Courage

Weapon

Governor Haber

1

4

4

9

Luger

Leutnant Kempf

1

5

4

8

Luger

Feldwebel Schipmann 

1

4

4

5

Luger

Truppen

2

4

4

4

Mauser

Einheimische Polizei 

6

3

3

3

Mauser

Machete

Unteroffizer Krupp

1

4

4

5

Luger

Truppen

2

4

4

4

Mauser

Einheimische Polizei 

6

3

3

3

Mauser

Machete

Feldwebel Schmitt

1

4

4

5

Luger

Truppen

2

4

4

4

Mauser

Einheimische Polizei 

6

3

3

3

Mauser

Machete

Feldwebel Daimler

1

4

4

5

Luger

Truppen

2

4

4

4

Mauser

Einheimische Polizei 

6

3

3

3

Mauser

Machete

Unteroffizer Offstag

1

4

4

5

Luger

Truppen

2

4

4

4

Mauser

Einheimische Polizei 

6

3

3

3

Mauser

Machete

Engineers

2

0

0

0

Unarmed

Snipers

1d4 +

4

na

na

Mauser

Leutnant Fiebig

1

5

4

7

Luger

Settlers and misc 

10

3

4

3

Mauser

Machete


Stay tuned for Part 2 : The PHART phase and the unfortunate rigidification of Lt Bond - an after action report by Commander Beresford to AN & ME commander Holmes.