We started the Malaya 1942 CoC Campaign featured in the Lardies 2015 Christmas magazine Monday night. I'm going to be the 'neutral' Umpire for these games. So far Dave is locked for the Japanese side and George for the Australians, Al and Maurice haven't selected a side yet. Having two players sharing command per nationality means we can most probably still play on even without a full house! The forces are my 1/72 Airfix plastic men with support figures and vehicles from various makers!
During the game Gunso Shitmee urged his support men on as the Infantry advanced into the 'huts of death'...
Game 1 'Winning the Encounter Battle' Patrol Scenario
Aussie Forces
Core Platoon
Extra Infantry Section
Medic
Jap Forces
Core platoon
Ha Go Type 95 Tank
The AAR
The Japanese plan was to hold on their left and deploy strong forces to their right and sweep the Australian Dogs they suspected were in the village aside. Initially they deployed a section to each side of the road occupying a hut with one and lining the edge of the village clearing with the other, the platoon 2IC leading the latter. In reply the Aussies set up a section along the bund of the rice paddy on their right flank supported by a mortar team and a firefight started straight away which lasted the entire game! The Aussies won this shootout in the long run when the Japs after taking four casualties retired into the Jungle! A single Aussie was hit.
On the other side of the 'road' the Jap right was strong, two infantry sections and the platoon support faced off against two Aussie sections! The Japs of the lead section advanced swiftly through the village occupying all the huts. These men then became a target of some very effective Aussie fire directed by their platoon Sergeant, Barry Griswald a hardened career soldier. Griswald eventually brought the fire of all three of his platoon's sections on the Japanese advancing through the village. The Jap hit from the front and flank were decimated! In no time half of the Japs in the village became casualties! Despite the withering fire and their leader being wounded the leading Jap section showed great resilience, not only did they maintained their forward position they returned fire!
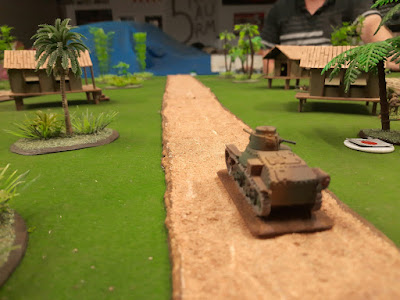
While the two flanks duked it out a battle within a battle began, Gunso Tomato drove his Type 95 Ha Go tank down the road hoping to panic the Imperialist Vermin! This bravado ended up with his vehicle becoming engaged in a duel with Diggers Bluey and Curly who were armed with a trusty Boys Anti-Tank Rifle! This confrontation resulted in a draw; a Boys round hitting the tank causing the crew to panic whilst Bluely was knocked unconscious by a ricochet, a spent Jap bullet hitting him in the head, Curly said later it was the safest place for Bluey to take a blow!
At this point with his plan fulfilled the Australian CO Second Lieutenant Witherspoon decided to withdraw keeping his force intact to fight another day, he had inflicted 14 casualties whilst only taking a three, unfortunately for him a flurry of Jap mortar rounds hit his men as they retired doubling the Aussies losses!
Some pictures of the Action
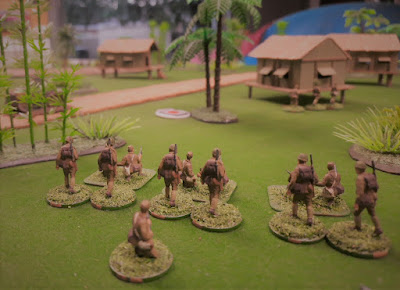
The lead Jap section deployed into the village, a roar rang out from the men as they appeared to be on the verge of capturing the village!

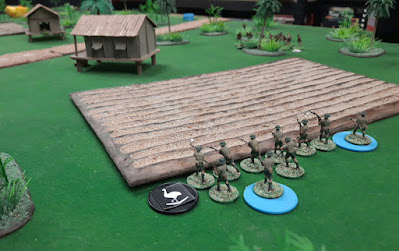
Witherspoon's 'extra' section deployed along the bund of a paddy field of the Aussie's right, here they stayed for the game successfully pushing back the Japs they faced!
Overview of the battlefield after a couple of rounds of play, the Aussies to the left and the Japs to the right...

Gunso Tomato's Ha Go tank arrived at the battlefield and barrelled down the 'deserted' road!
The Japanese right advances!

The Jap right flank from above, two sections supported the lead one advancing through the village...

An overview of the battlefield just before the Aussie withdrawal, they had inflicted 14 casualties whilst taking only seven, it could have been worse for the Japs as two casualties were converted to wounds on their NCOs!

Result Stuff
A Japanese Victory and an Australian Losing draw!
A good night was had by all and even though we hadn't played CoC for quite a while we went thorough the evening only rarely referring to the rules!
Aussie after Game Stuff
Section 1: 4 Casualties
Section 2: 2 Casualties
ATR Team: 1 Casualty
3 return next Game
2 miss next Game
2 Killed
Total reduction 4 figures for the next game!
For Campaign resolution:
CO Opinion = +1
1 D6 = 5 was rolled due to Losing Draw
OR Opinion = 0
1 D6 = for fewer dead 2 was rolled no change
Jap after Game Stuff
Sekushon 1: Gucho Wounded 4 Casualties
Sekushon 2: Gucho Wounded 7 Casualties
Sekushon 3: 3 Casualties
7 return next Game
4 miss next Game
3 Killed
Replacements: 5 (rolled a 2, leader = 0, casualties = 7)
Total reduction 2 figures for next game!
For Campaign resolution:
CO Opinion = +2
1 D6 = for victory 5 was rolled Opinion +2
OR Opinion = -2
1 D6 = for higher Casualties 4 was rolled -1
1 D6 = Very heavy casualties 1 was rolled -1
Looks like a good game :)
ReplyDeleteHey Kym, thanks!
DeleteYes it was a good night, we're playing game 2 next catch up then will try a game every third session so will eventually get through the campaign!